Module D: Mixing and Editing
Mixing and Editing UCSD Spring 2013
Mixing and Editing
Copyright © 2012 by Issac Garcia-Munoz
Cover by: Issac Garcia-Munoz
Creative Commons License
ISBN-13: 978-1-451-51000-X
ISBN-10: 1-451-51000-X
Book Website
www.ucsd.edu
Email: igarciam@ucsd.edu
Printed in U.S.A
- Required watching: A Tour of Live
- Input/Output Routing
- Monitoring
- Inserts/Plug-ins
- Similarities/differences between Ableton and other Digital Audio Workstations.
|
- Signal Chain; I/O Routing and Monitoring.
- Give a basic audio effects quiz and if you need work go back and take MUS177C.
- Return Tracks.
- Creating/Importing Audio/MIDI tracks.
|
|
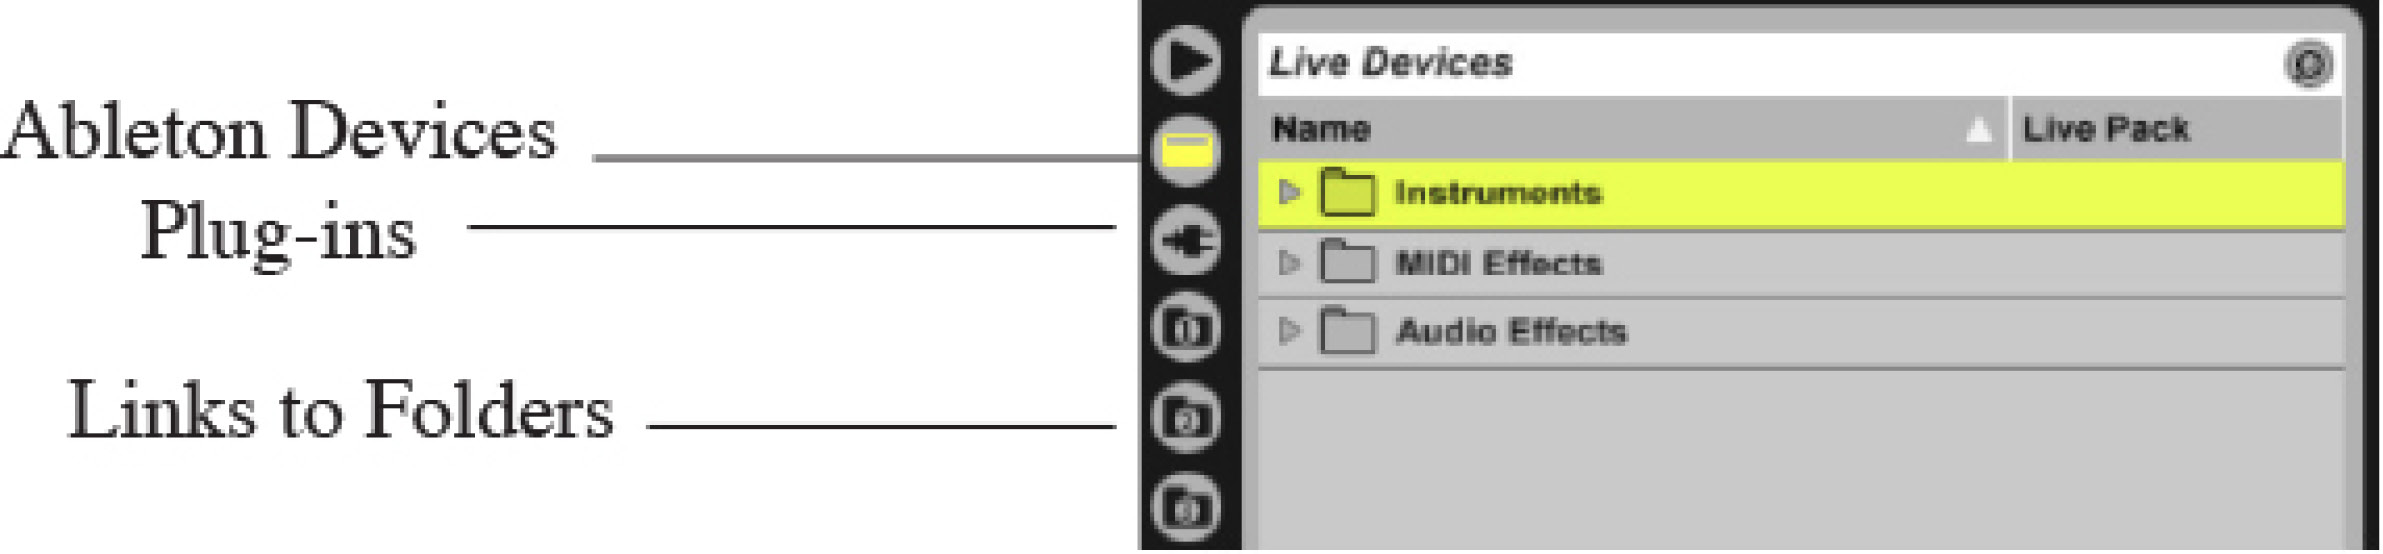
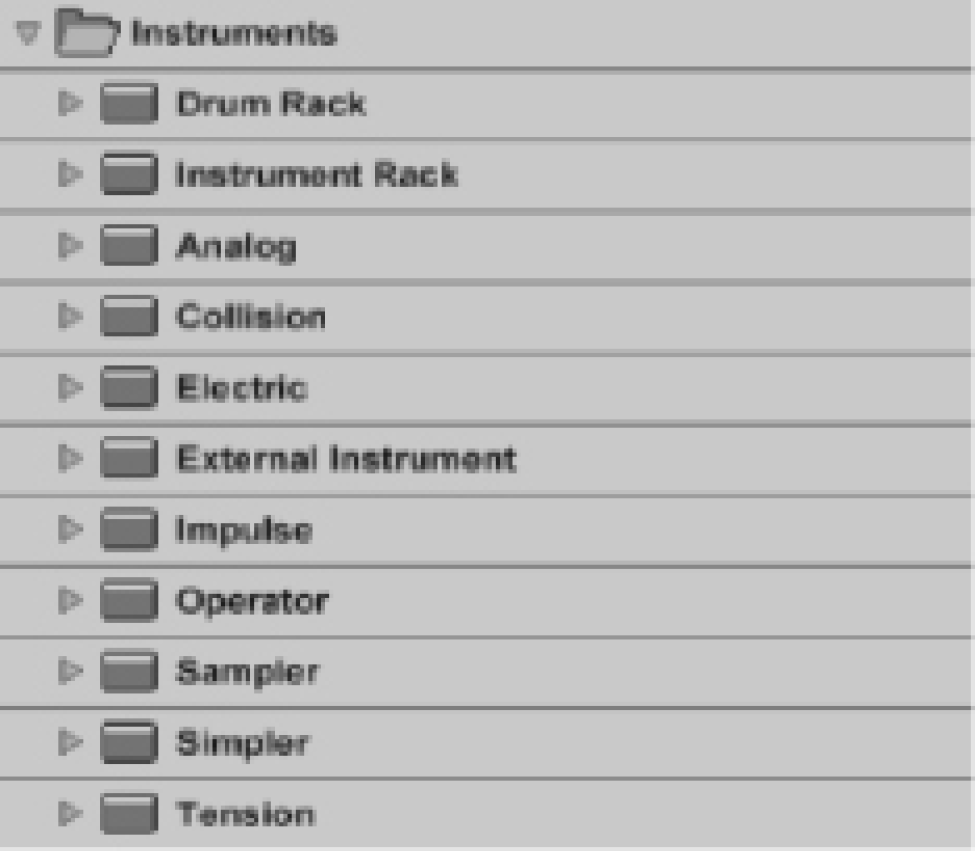
Instruments: Ableton native software instruments
MIDI Effects
Audio Effectv
I/O Routing and Monitoring
- In
- Permanently monitors the track’s input.
- Analogous to an “Aux” track/channel.
- No output from clips in the track.
- Auto
- Monitors the input when track is armed.
- Off when clips are playing.
- Off
- Useful when using an external audio interface to monitor.
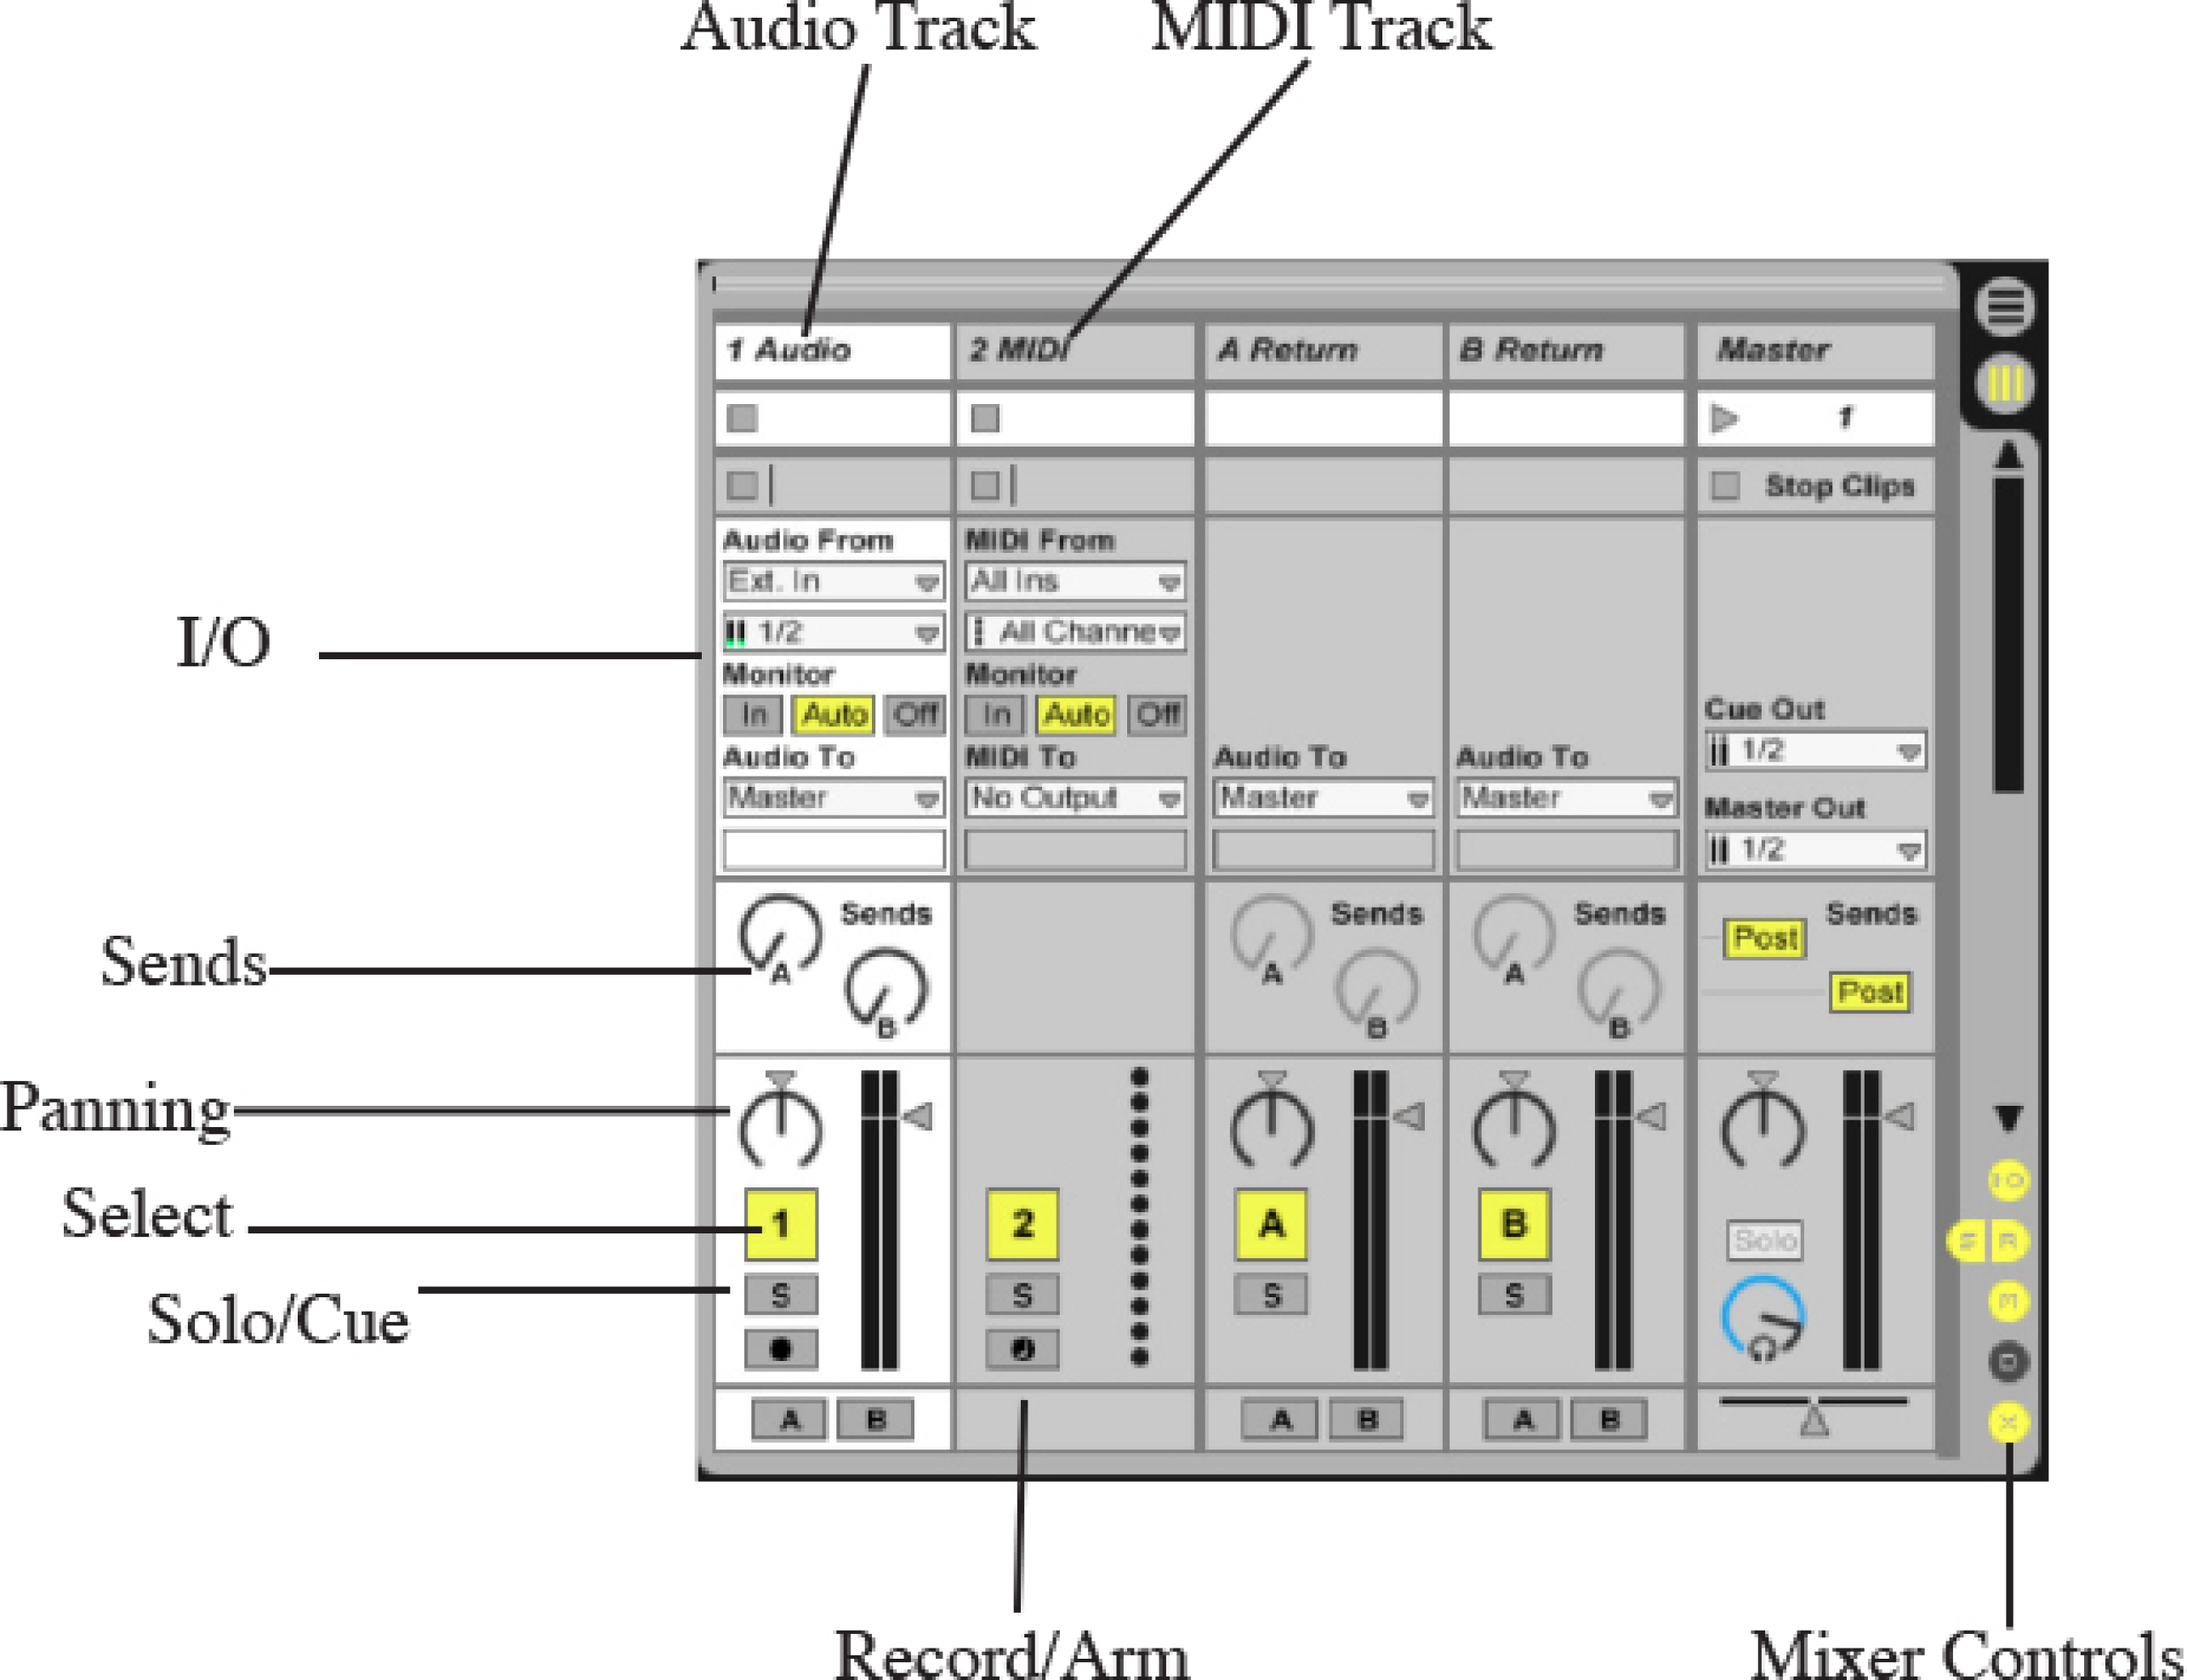
- The upper chooser pair (Audio/MIDI From) selects the track’s input. Return tracks receive their input from the respective sends.
- The Monitor buttons select the conditions under which the track’s input is heard through the track.
- The lower chooser pair (Audio/MIDI To) selects the track’s output. (MIDI tracks without instruments don’t have outputs).
Arm Buttons
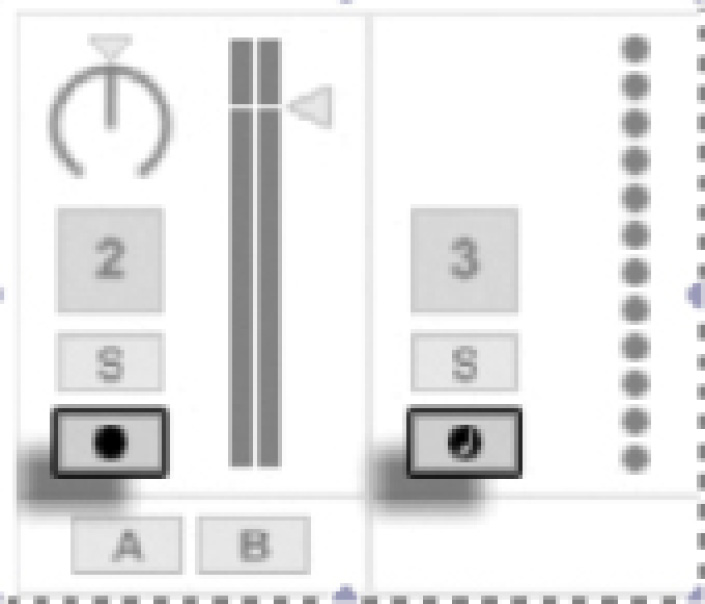
When a track’s audio input is
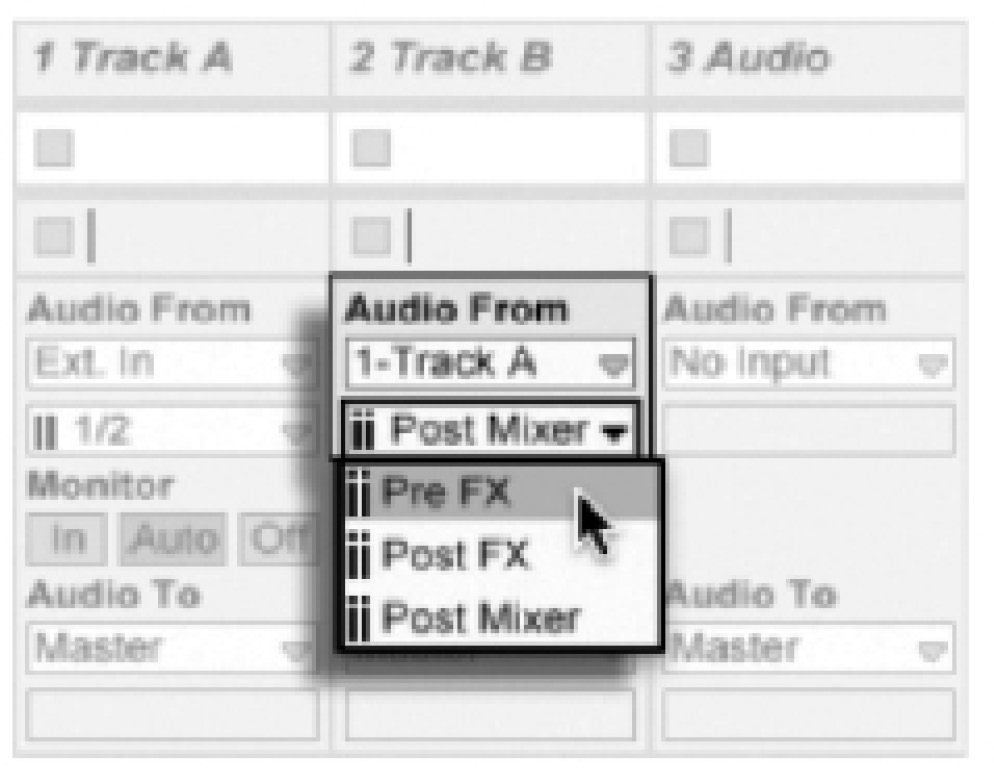
from another track:
- Pre FX
- Taps the signal that is coming directly from a track, before it has been passed on to the track’s device chains (FX) or mixer.
- Soloing will allow you to hear the tapped track.
- Post FX
- Taps the signal at the output of a track’s device chains (FX), but before it has been passed back to the track mixer.
- Soloing will allow you to hear the tapped track.
- Post Mixer
- Taps the final output of a track, after it has passed through its device chains and mixer.
- Soloing will not allow you to hear the tapped track.
I
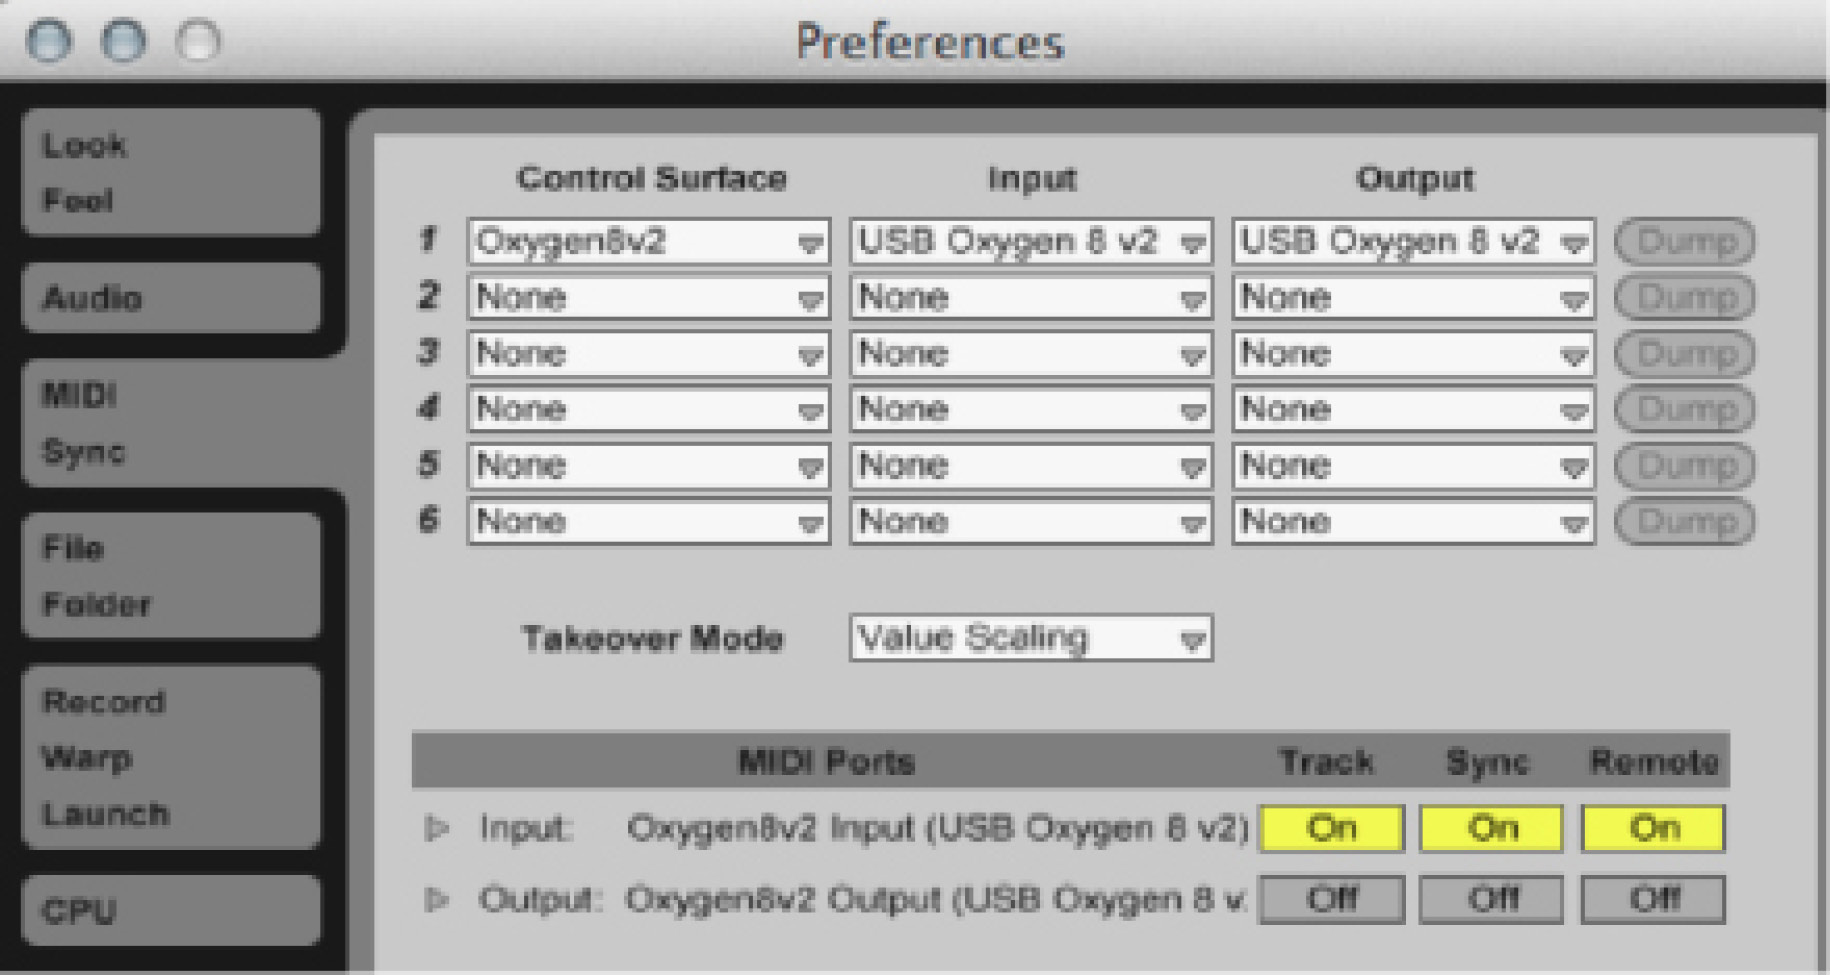
f a controller is natively supported then it will be listed in the drop down of Control Surface.
Otherwise enable under MIDI Ports.
Mapping the MIDI Controller
Cmd+m (CTRL+m) enables MIDI mapping mode. Also the MIDI button at the top right:

The controllable parameters will be highlighted blue.
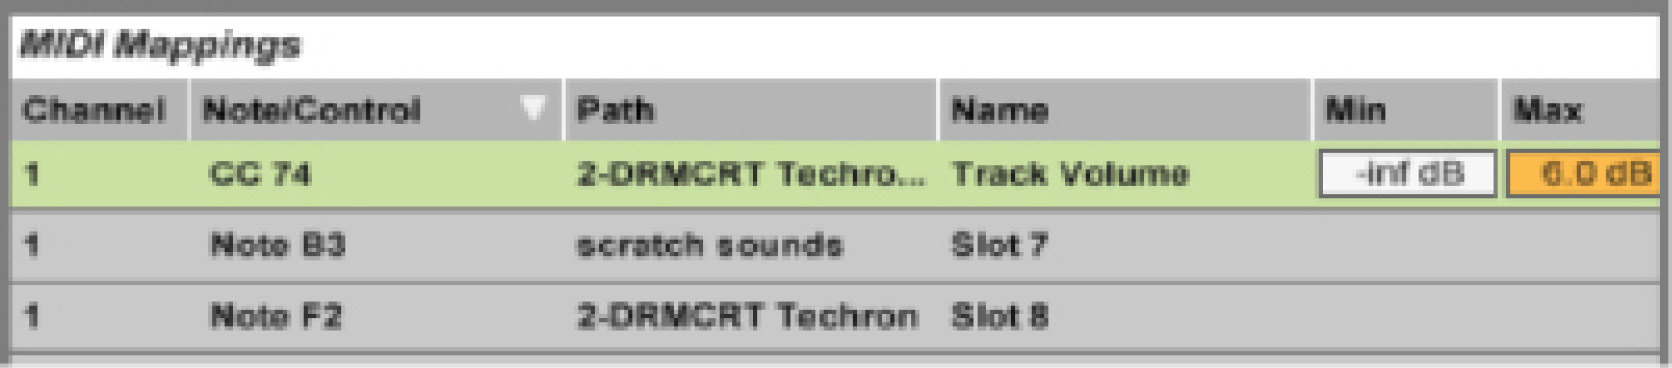
Click on the one you wish to map, then activate a key/knob/fader on the controller to assign the mappings which will show up under MIDI Mappings:
- Back to arrangement button
- will turn red every time a clip is triggered in session view
- indicates that you hear a different playback from what is recorded in arrangement view
- will cause the playback to come from arrangement when clicked, even if other clips are playing in session view
- all of the above
Arrangement and Session views:
- Have the same track names
- True
- False
- Always contain the same contents (i.e. same audio or MIDI recordings) on the same tracks
- True
- False
- Share the same instruments and effect on same tracks
- True
- False
- In Arrangement view extending a clip (dragging its ends) results in:
- Repeated loops if the “Loop” is selected in the clip
- Extending the playback sections (start or end points) if “Loop” is not active
- Both 1 and 2.
- None of the above
- In Arrangement view switching a clip “Slave” button to “Master” will:
- Play the clip solo and turn on the “back to Arrangement” button red
- Loop the clip while other tracks keep playing
- Alter the tempo of the project to be according to the clip tempo
- None of the above.
|
Audio Files;I/O Settings;Recording:Triggering
|
Inside the clip view: Beat markers, Warping, Tempo, Looping
|
Warping Methods: beat, tones, comples
|
|
|
- Wapring: Ableton Tutorial
- Wapring drum track tutorial (wav file included)
Warping Lab
|
|
Recording on an Audio Track
- Choose audio input from I/O section
- Arm track (record button on the track)
- Record
- In Session view click the record button in a clip
- In Arrangement view click record button in top transport bar and then play.
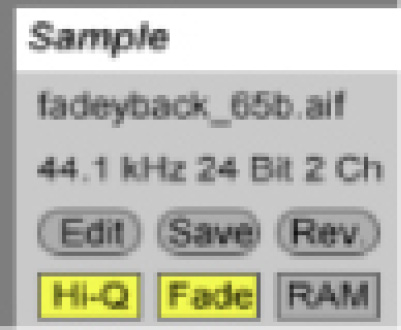
Reverse Vocal Effect
- Make copy of vocal clip
- Select only the part you want to use
- Reverse (in the Sample box)
- Reverb (with long tail)
- Add an audio track (name it “processed”)
- Route your reversed clip output to the “processed” track
- Record under the processed track
- reverse the recorded track
- crop so that you only have the reverb tail (this will give you the lead-in effect)
P
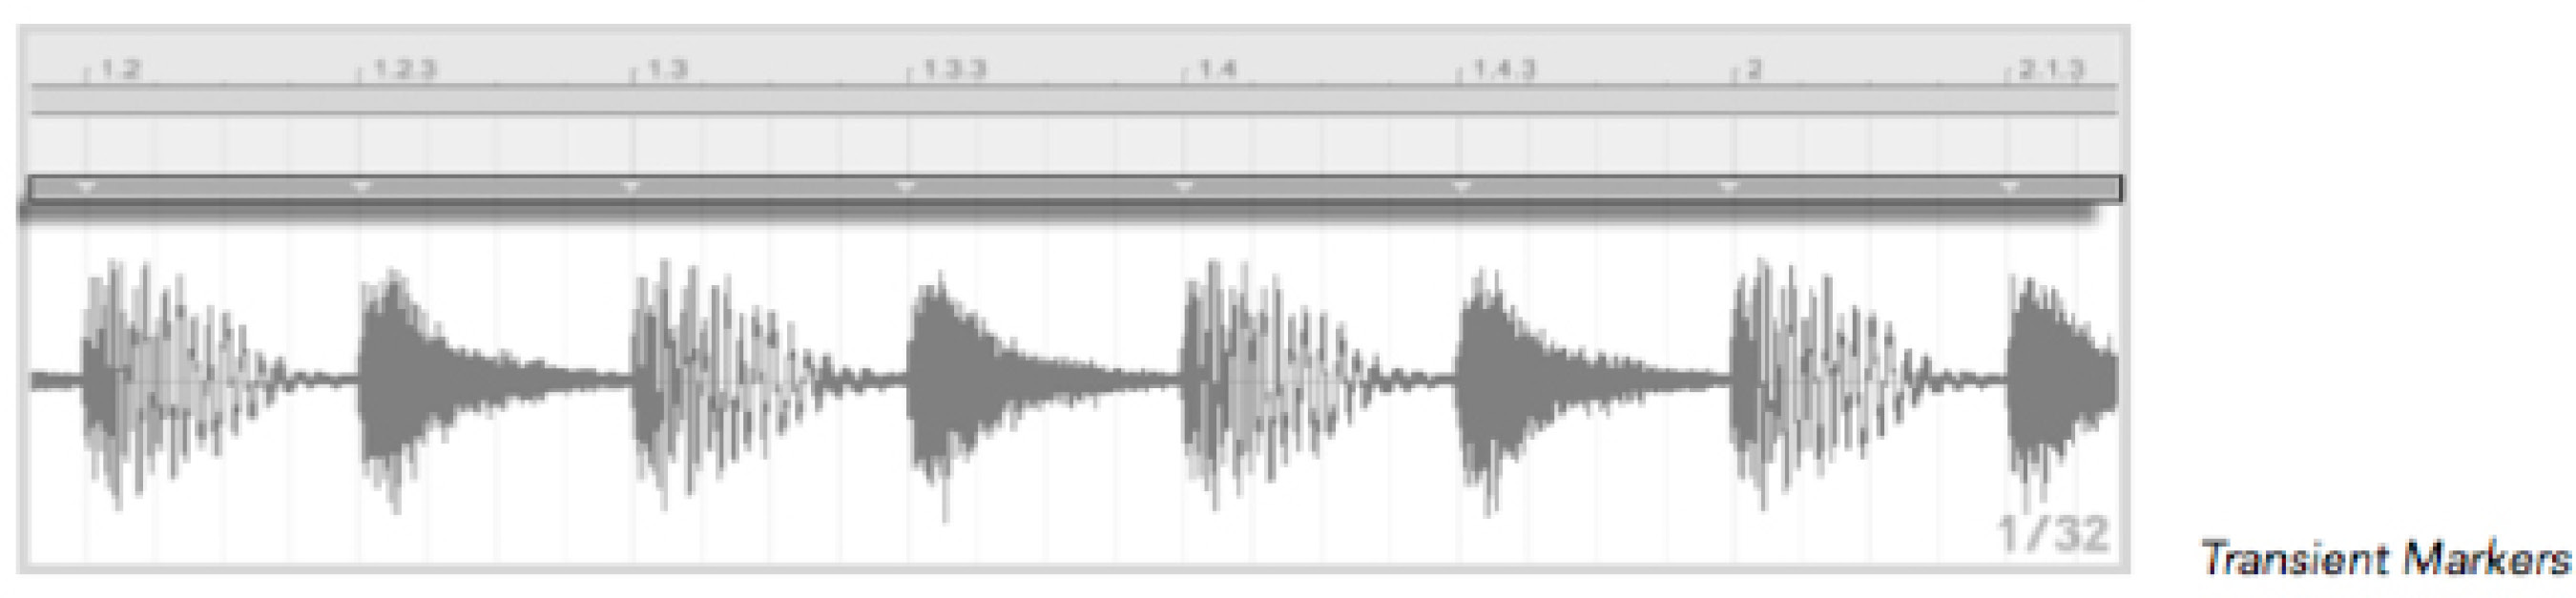
seudo-markers: are in grey and appear above where Live thinks there is a beat. .
- holding shift allows you to move the place of the pseudo-marker around
- double click to set a warp marker
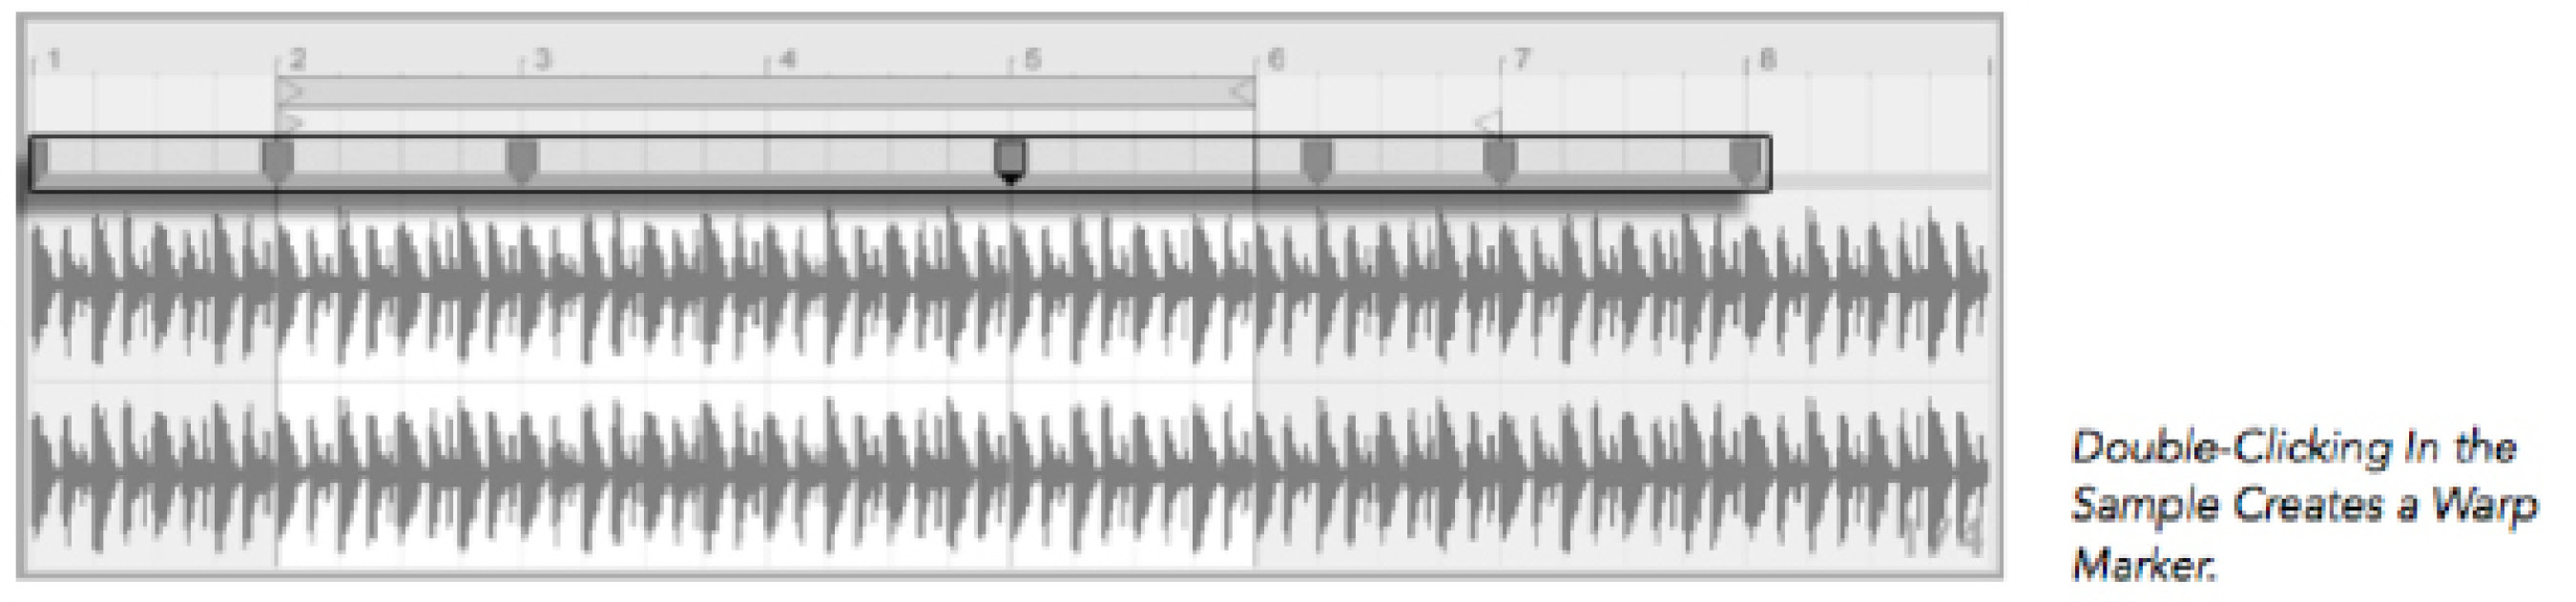
Holding shift and dragging shifts the whole waveform. (can use this to eliminate silence at the beginning of a track by shifting the waveform to position 1)
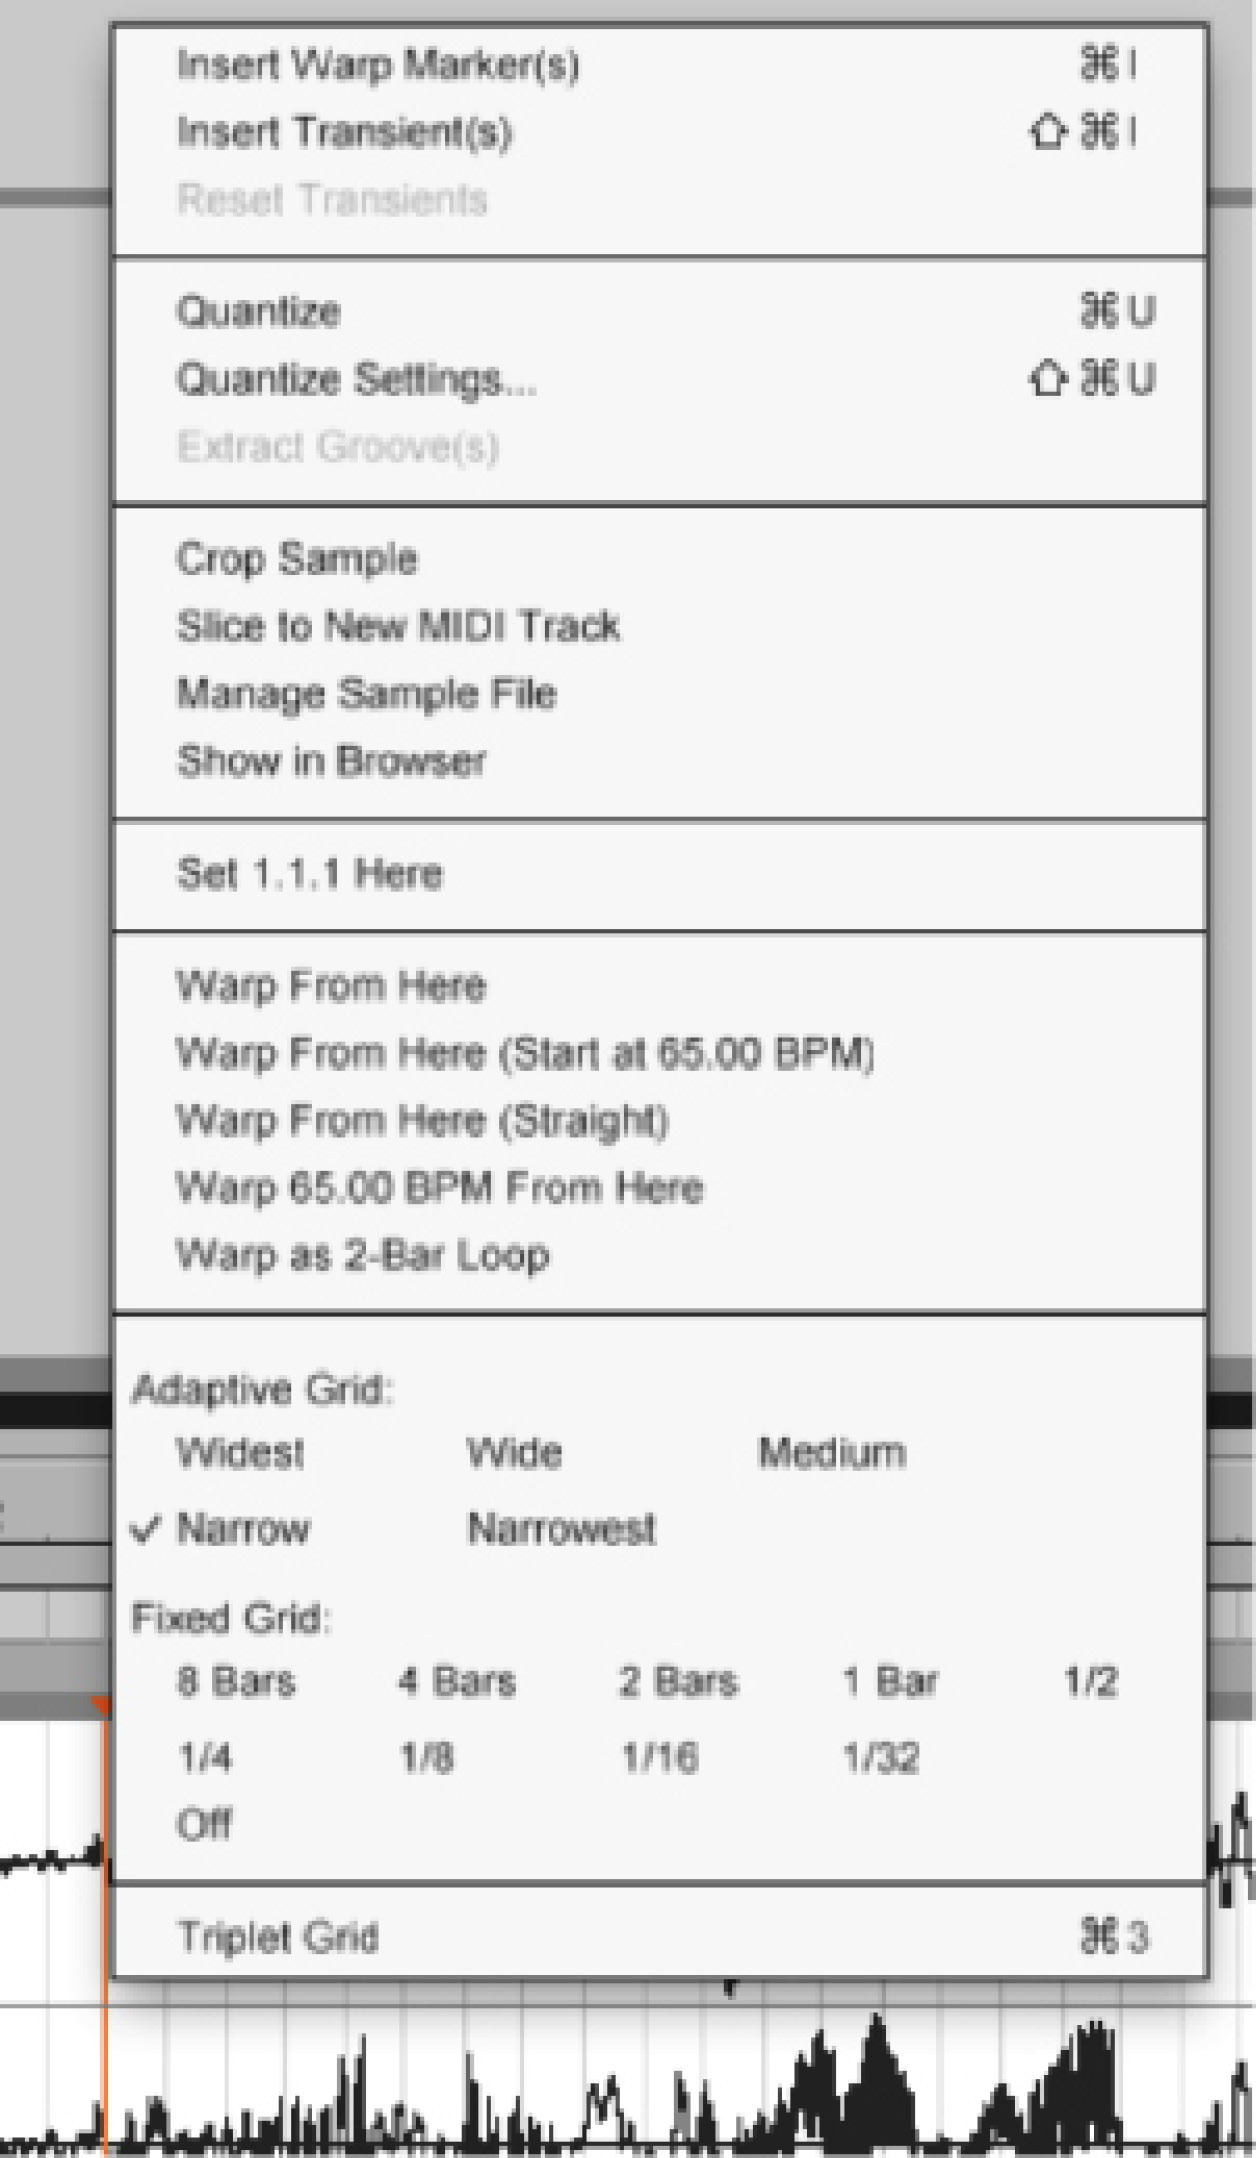
To have the clip start at a particular place in the clip select the place and Ctrl + click and select "set 1.1.1 here"
W
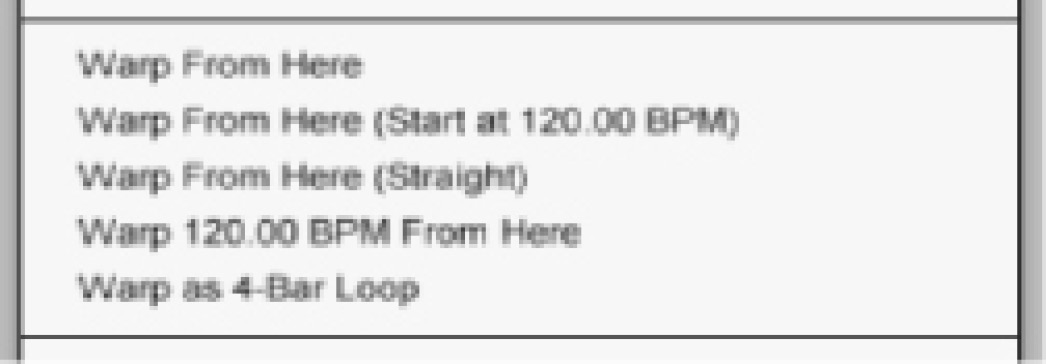
arp From Here: Auto-Warps to the right of the selected marker.
Warp From Here (Start At ...): Auto-Warps using the current Live Set's tempo as a starting point for tempo tracking. To use this first:
Deactivate the Warp switch for the clip so that it plays unwarped
Use the Control Bar's Tap Tempo button to tap along and match that of the clip
Turn warping on again and use the Warp From Here (Start At ...) command to use your tapped tempo as a reference.
Warp From Here (Straight): Auto-Warps assuming no tempo variations (common in electronically produced works).
Warp ... BPM From Here: used in cases when you happen to know the exact BPM value of an electronically-produced work and can type it into the Control Bar before warping.
- Warping:
- needs to be turned on in order to loop clips
- can insure that a track plays in the tempo of the project
- can assure that clips are triggered “on the beat”
- all of the above
- The most appropriate Warp Mode for drums is:
- Beats
- Tone
- Texture
- None of the above
- The most appropriate Warp mode for a song with multiple instruments is:
- Tone
- Re-Pitch
- Complex
- None of the above
- Recording new material into a clip slot in session view is done by:
- pressing record and play buttons on the transport bar
- pressing track arm and clip record buttons
- pressing track arm and record button on the transport bar
- pressing record and play on transport and clip play buttons
The assignment consist of creating a small arrangement of a guitar and drums.
The learning outcomes are:
1. Using midi files
2. Working with Impulse and designing your own drum set
3. Working with warping markers
Instructions:
Download warping lab files here.
Use Drumloop.wav, Guitar.aif and House.mid clips to create 3 tracks.
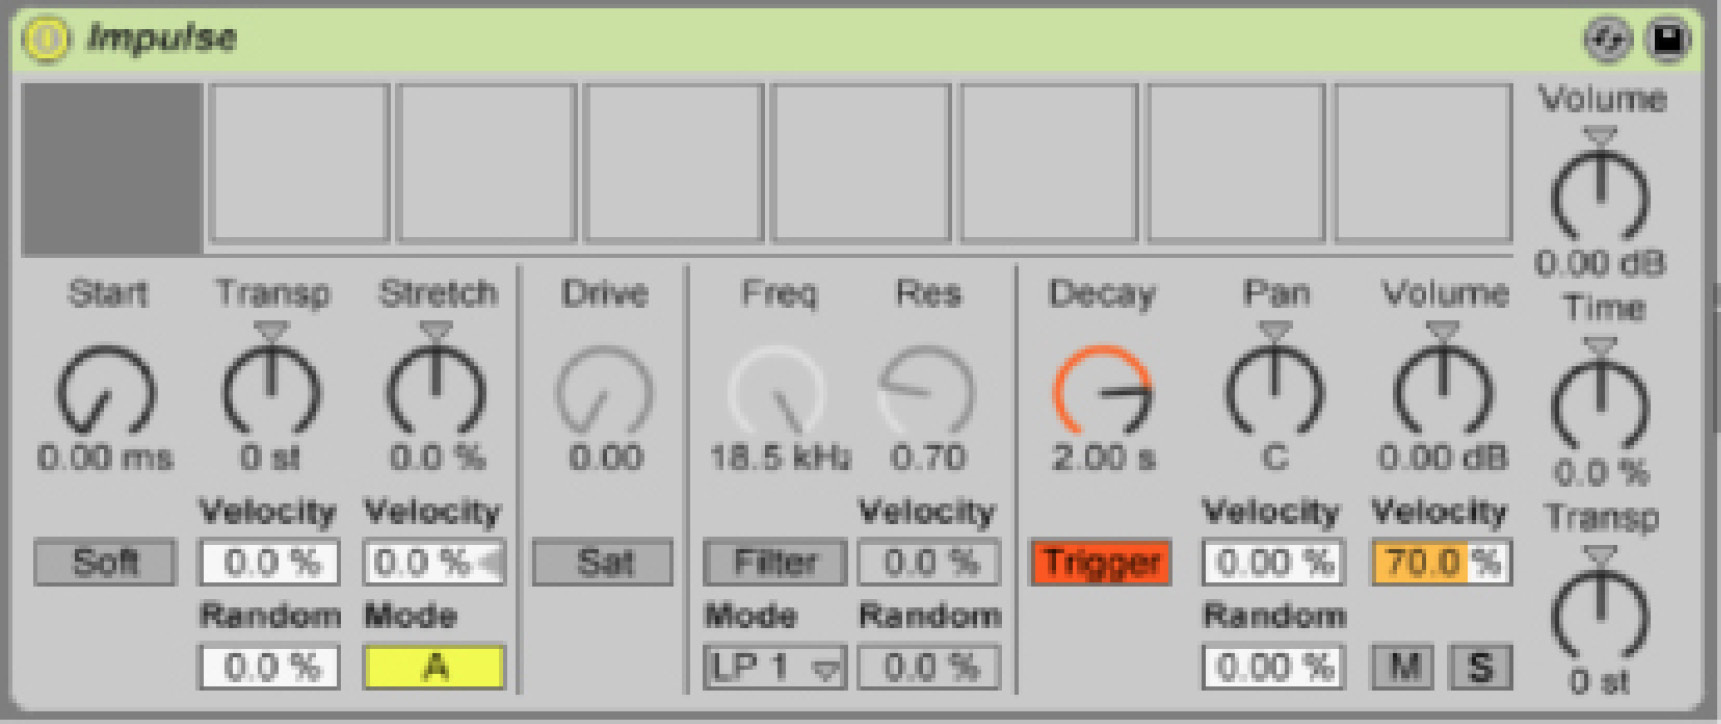
Assign Impulse instrument to the midi track.
Inside Impulse assign the drum samples (the other files downloaded) to slots in impulse so that they correspond to a standard drum set.
Listen and visually browse the midi track to find out which notes are triggering which ipulse slots and how they should correspond to the instrument samples.
Guitar Track; This track has problems with initial warping, so you need to perform the following actions:
Remove leading or trailing silences either by clipping (use clip function from contextual menu) or by setting the Start Marker to beginning of the song.
Locate the first clear downbeat. Make sure it falls on the beginning of the note.
In case there is a short segment of sound preceding the first transient market, such as a slow attack, double click at the beginning of the note to create Warp Marker there.
Right-clik the transient market to set the first bar 1.1.1 from context menu.
Right click again and select “Warp from Here”.
Listen and correct again if needed (Hint: use a metronome to check the “correctness” of your warping)
Record you result, render to audio and save.
Upload to the SoundCloud account.
Working with MIDI Clips and Instruments
| MIDI Track, files, recording, instruments and piano roll |
Overview of intruments and sysnthesis techniques; Ableton Instrument Racks |
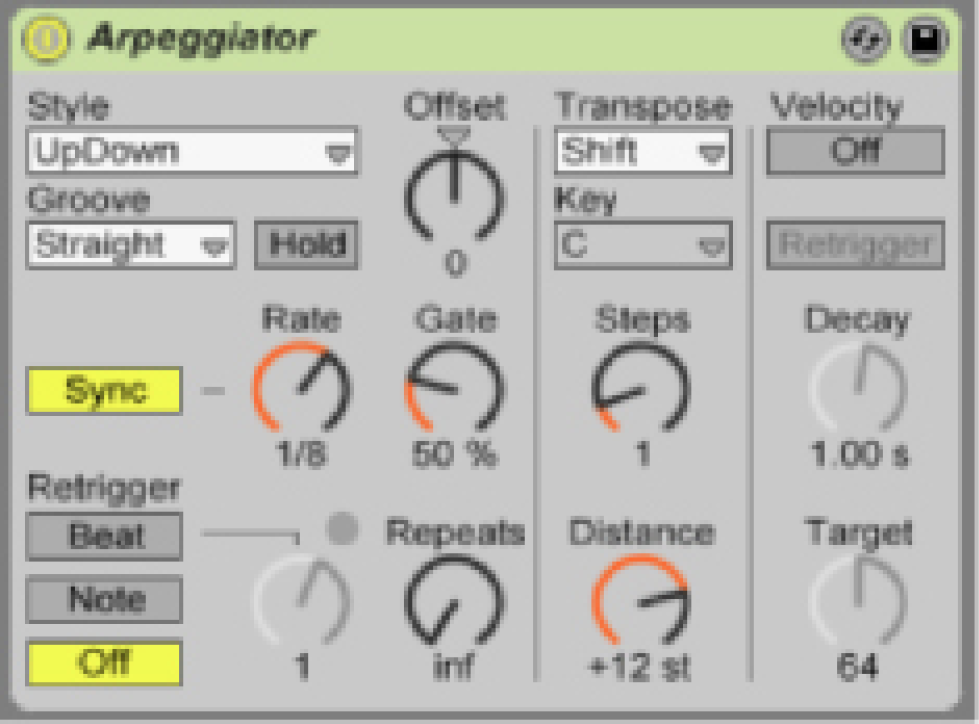
Inside the MIDI clip: working with MIDI editor, MIDI Effects; Arpeggiator |
|
|
|
|
- In Session view insert a drum kit to the MIDI track
- Double-click a clip slot to get an empty clip (you will now be able to see the piano roll)
- Default loop length is 1 bar. You may change the loop length in the Notes box.
- Turn Draw Mode ON (Options->Draw Mode)
- Draw your notes on the piano roll (or play them if you are using a controller)
- Note that when you draw in the piano roll the notes match the grid spaces.
- You may right click and change this grid spacing to a note value or turn off fixed grid to free write.
- With Draw Mode OFF you can move your notes around and edit the length of the notes.
- Notice that below the piano roll are the velocities (loudness) of each note. You may choose to change these (with Draw Mode OFF) to create accents.
- If time permits:
- Switch to arrangement view
- Insert an instrument in another MIDI track
- Add a melody to the beat you just created
- A MIDI clip in a track
- will not produce sound when played if there is no instrument dropped in
- will produce the same sound in Ableton as the sound when played from disk (when double clicked on in Finder / Explorer)
- will not produce sound if there is no MIDI effect selected
- will play only as a drum loop but not as melody
- In the Session view the clip slots are used to hold
- Audio recordings only
- Audio or MIDI Effects
- Automation envelopes
- Audio or MIDI recordings
- Scene Launcher is used:
- To trigger a single clip
- To play back all clips in one track
- To play back looped sections of a clip
- To play back simultaneous clips across all tracks
- Clip Launch mode is used:
- To determine if clips are playing back in the correct tempo
- To determine if clips are triggered on the beat
- To determine what mouse operation starts or stops the clip
- None of the above
- A Single Track can contain:
- a combination of MIDI and audio clips
- cannot mix audio and MIDI clips
- can only contain audio effects
- can only contain musical instruments
|
Understanding the standard drum set and drum track; Using Impulse to create a drum set
|
Collection of drum patterns, drumming styles, Goove, Drum Racks
|
Rhythmic Effects: beat repeat, ping-pong, side chaining (ducking) and pumping base
|
|
|
|
|
Drag samples to create a drum kit:
Beat repeat allows for the controlled or randomized creation of repetition of an incoming signal.

- Side chaining effect
- Can be done on any sound effect
- Exist only on midi tracks that are not frozen
- Uses audio output from one track to control an effect parameter on another track
- None of the above
- Select one typical use of side chaining
- Controlling a rate of bouncing stereo effect (ping pong)
- Create a rhythmic pattern from constant noise or note
- Routing multiple audio clips to one effect
- None of the above
Advanced Effects and Devices
|
Overview of effects (mastering, creative), Plugins, Using the Return Track (*)
|
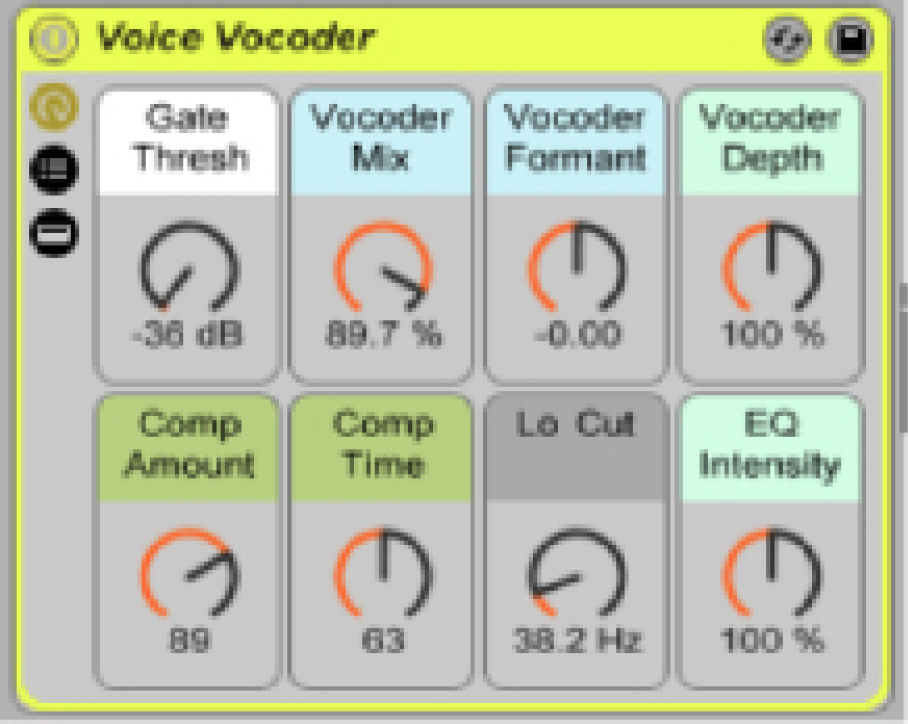
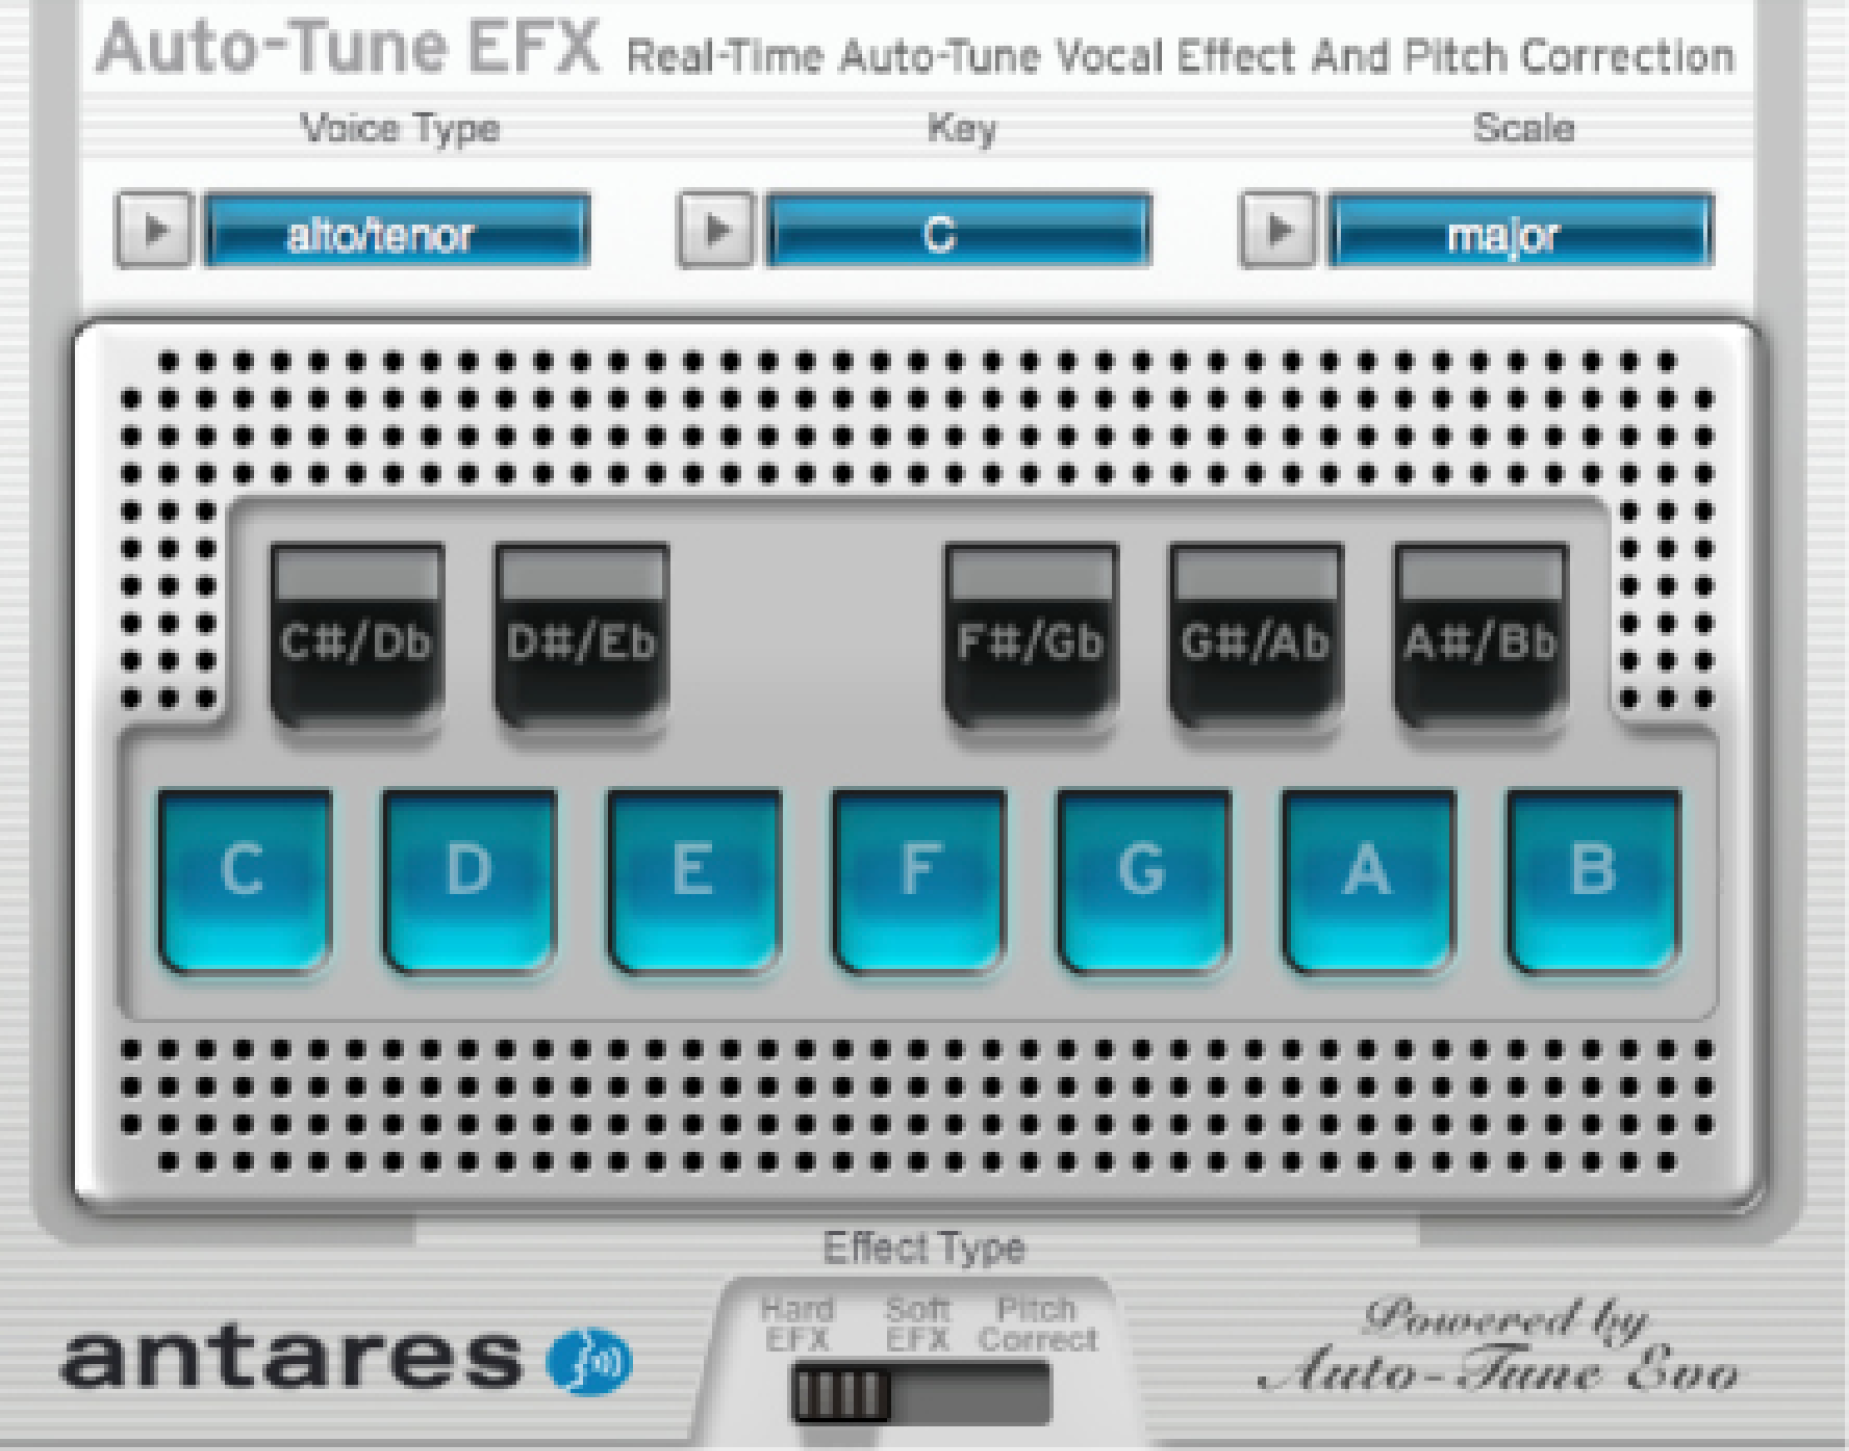
Voice processing – talkbox, vocoder, TPane / melodyne
|
Synthesis methods: Operator (FM), dubstep
Max For Live?
|
|
|
|
|
Effects Quiz (review from ModuleB 4a/b and 6a/b/c)
- Which of the following cannot determined by viewing the frequency spectrum of a sound?
- Whether the sound has a fundamental frequency.
- Whether the sound has harmonics.
- The brightness of the sound.
- The source of the sound.
- Using a compressor is a way to...
- Control the amplitude based on an input signal.
- Flatten the dynamic range.
- Equalize loudness.
- All of the above.
- EQ can be used to...
- Equalize loudness.
- Adjust the amplitudes of certain frequencies.
- Equalize pitch.
- Adjust the timbre.
(add filters and reverb)
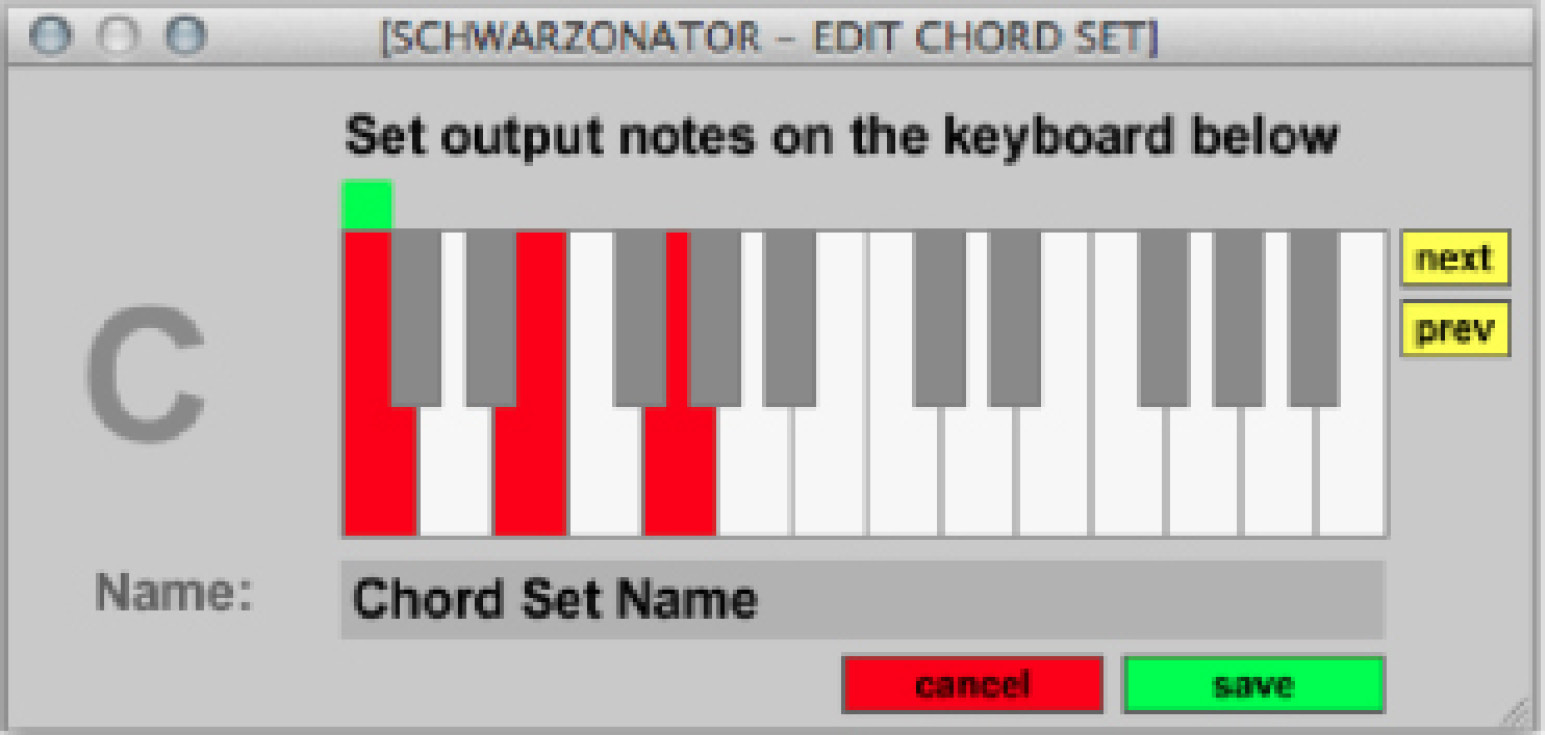
Schwarzonator: Max for Live MIDI Effect
A

bility to form chords from single note input:
Red note was user input
Green notes were added by the effect
Chord Sets
White notes are all the possible notes in this chord set
If a user plays a note outside of the chord set it will be changed to a white note.
Chord sets can be traditional Major/minor scales or unique to a composition/song
To create a chord set you must specify what chords to play for a given note:
Other parameters (can be automated):
Addnotes - number of notes in the chord
Spread - how far apart the notes are in the chord
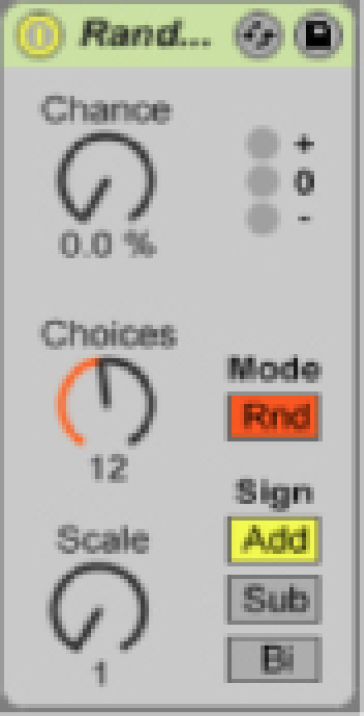
Random - randomly shifts input note up/down
Octave - shifts notes up/down octaves
Dynamic - randomization of the velocity of each note

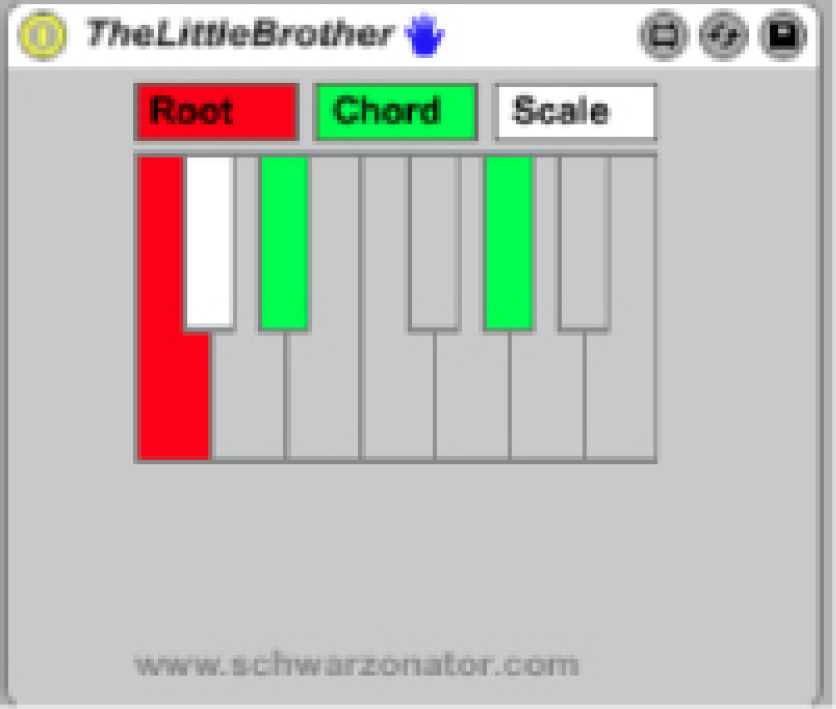
This MIDI effect connects in the background to Schwarzonator so that your other MIDI instruments can match the chord set.
All the instruments with TheLittleBrother will follow the chord progression.
Audio Effects:
- Can only be dropped on audio tracks
- True
- False
- Effect parameters cannot be automated from clip envelopes but only from device envelopes on the arrangement track
- True
- False
- Can appear before and after a MIDI instrument
- True
- False
- Instruments can be dropped on audio tracks
- True
- False
When MIDI keyboard is assigned to trigger clips or change device parameters:
- It can not be used for playing music notes anymore
- True
- False
- IAC Midi Driver is
- Used to route MIDI messages between programs on the MAC
- Can be used to route MIDI from Abelton clips back to Ableton remote controls
- Needs to be set “online” in Audio Midi Setup
- All of the above
|
DJ Software
|
DJ Tools and Effects
|
Smart Mixing
|
- Beat matching
- Making a loop
- Tonality
- BPM
|
- Cueing
- Looping
- Sampler
- EQ for crossfading
|
- Theory of Moldovar Set
- Virtual DJ Mashup Exercise
|
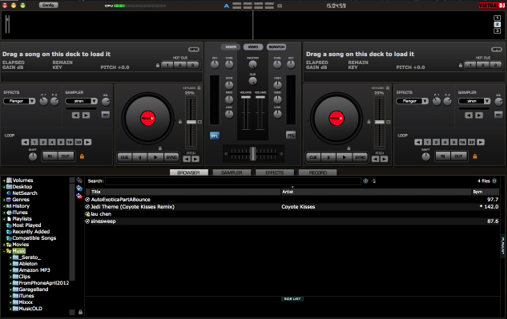
The equipment traditionally used by DJs to mix records for shows or remixes such as turntables, mixers and effects is now available in software. For example, Virtual DJ http://www.virtualdj.com/ and Mixxx http://www.mixxx.org/ are two free programs that offer a DJ setup. In this section we will explore VirtualDJ as a mixing option that can be used to create original remixes.
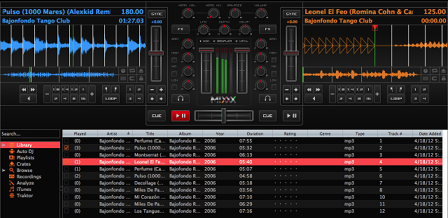
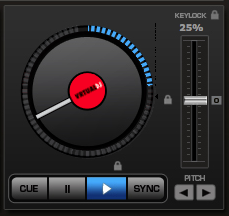
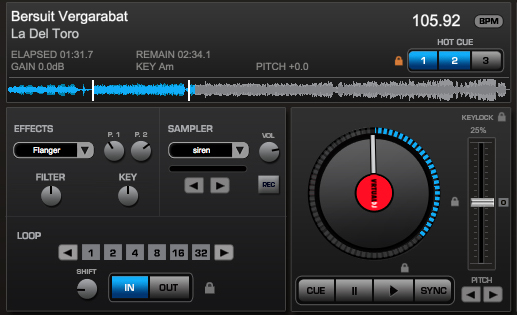
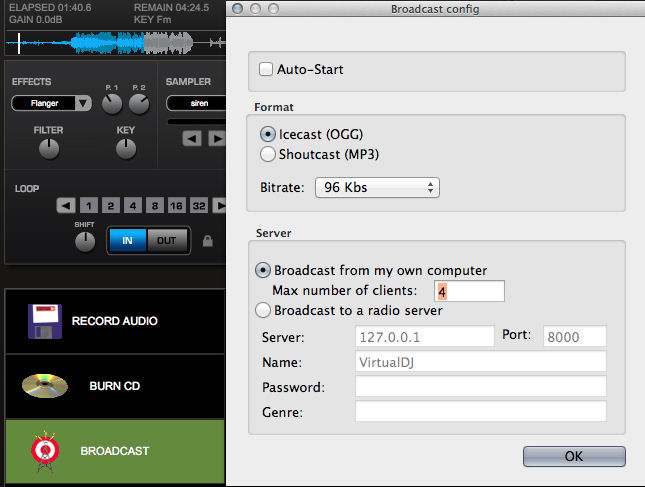
We’ve seen in Ableton that you can setup properly warped clips so that they will be beat matched when they are triggered at the session’s BPM (Beats Per Minute). VirtualDJ also detects the BPM of each track, but instead of warping, there is a SYNC button that aligns the two tracks (see FIG #).
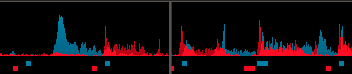
The waveforms scroll along the top of the window (FIG# ) and are color coded per deck. The squares underneath the waveforms show where the beat detection algorhythm thinks are the beats. If you start both tracks and press the sync button, you will see the squares and therefore the waveforms line up. Then you may crossfade freely between the two tracks since they are beatmatched.
VirtualDJ also estimates the tonality (shown as KEY) of the track in addition to its BPM. Why is this important? When crossfading between two songs that are not in the same key then the result will be more pleasant if the keys are harmonically related. This (FIG#) we see that the keys are F#m and C#m which are closely related since C#m is the Dominant of F#m.

For more information on mixing harmonically related material consider http://www.harmonic-mixing.com/HowTo.aspx and http://en.wikipedia.org/wiki/Closely_related_key
Ableton Live is able to maintain the tonality of a clip while changing tempo by pitch shifting accordingly. For example, if you speed up a track without pitch shifting down then you get the smurf effect. In VirtualDJ you have to pitch shift manually by using the Key Changer effect by moving the knob located in the Effects square or the semitone buttons under the Effects tab.

DJ Tools and Effects
Virtual DJ comes with a set of audio effects and tools that are common to remixing.
Cueing and Looping
CUE is a way to create starting point markers in a track. This is especially useful if there is a long introduction, silence or to make waypoints in the song structure. You may use the three CUE buttons or keyboard shortcuts. CTRL+1 sets cue point #1 from 1,2,3...up to CTRL+0 which is the 10th cue point. ALT+# of cue point moves you to that cue point.
Looping is another tool that deals with the playback of a track. In the LOOP section the numbered buttons represent the length of the loop in beats. Clicking the arrows changes the loop size and shift moves the startpoint of the loop. The keyboard shortcut are the numbers 1, 2, 4, 5, 6, and 7 with are loops of 1, 2, 4, 8, 16 and 32 beats respectively. The number 8 halves the loop lenths which is a fun way to get the stuck disc effect.
/Users/MacAudio/Documents/ScreenCaptures/Cueing.swf
/Users/MacAudio/Documents/ScreenCaptures/Looping.swf
Sampler
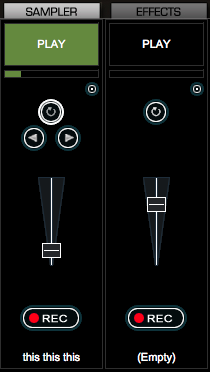
Sampling is the process of taking short clips from a piece of music, usually to be played intermidently or looped over another track. When the Sampler tab is in focus you will see something resembling mixer channels. You can load a different clip in each one and have an array of sounds that can be played at anytime over your mix. The circle button with the clockwise arrow loops the sample. With the arrow buttons you can change the loop length. The fader controls the volume individually for each sample. REC allows you to record the current mix to be used as a sample. These functions are also available in the Sampler square of each deck. 
EQ for Crossfading
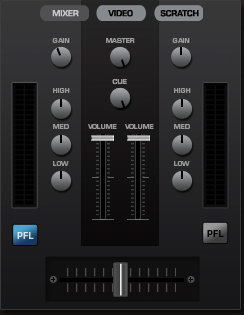
Most DJ mixers come with at least a three band EQ which is useful for crossfading. Once the two tracks are beatmatched, as shown previously, a simple crossfade results in the two tracks overlapping. In the case of tracks with heavy kick drums, if we cut the low frequencies of the track we’re crossfading into and then bring them back up at the 50% crossfade point while cutting the lows from the track that was playing then it will result in a smoother transition. The underlying principle is to prevent frequency bands from being oversaturated during the crossfading.
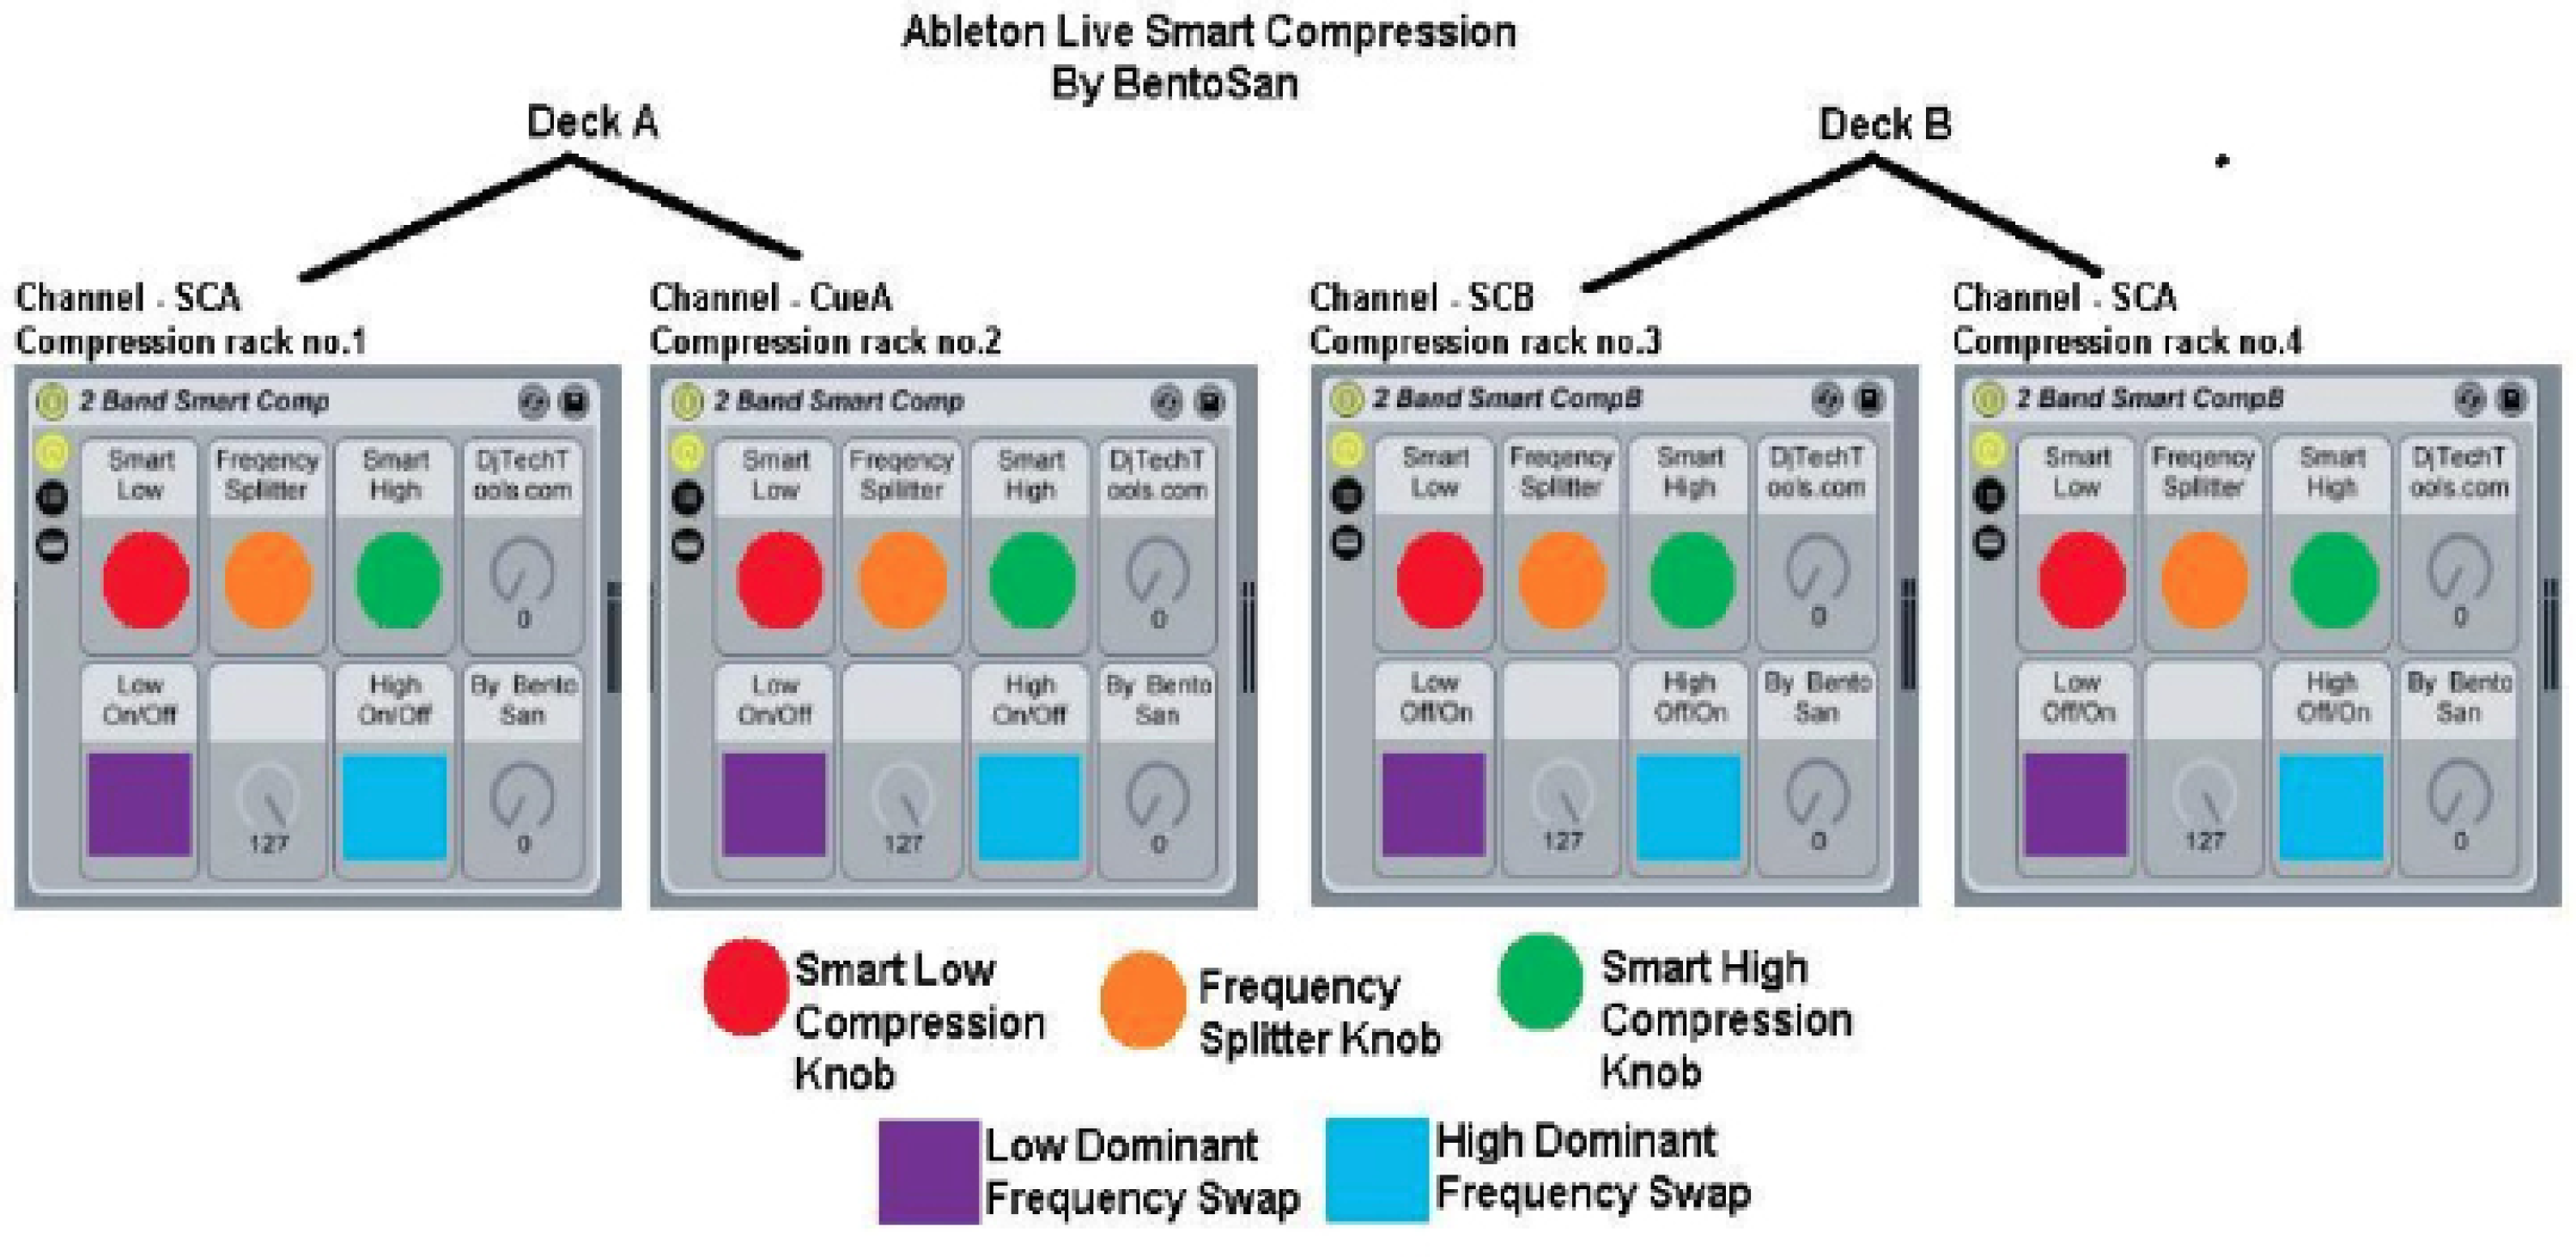
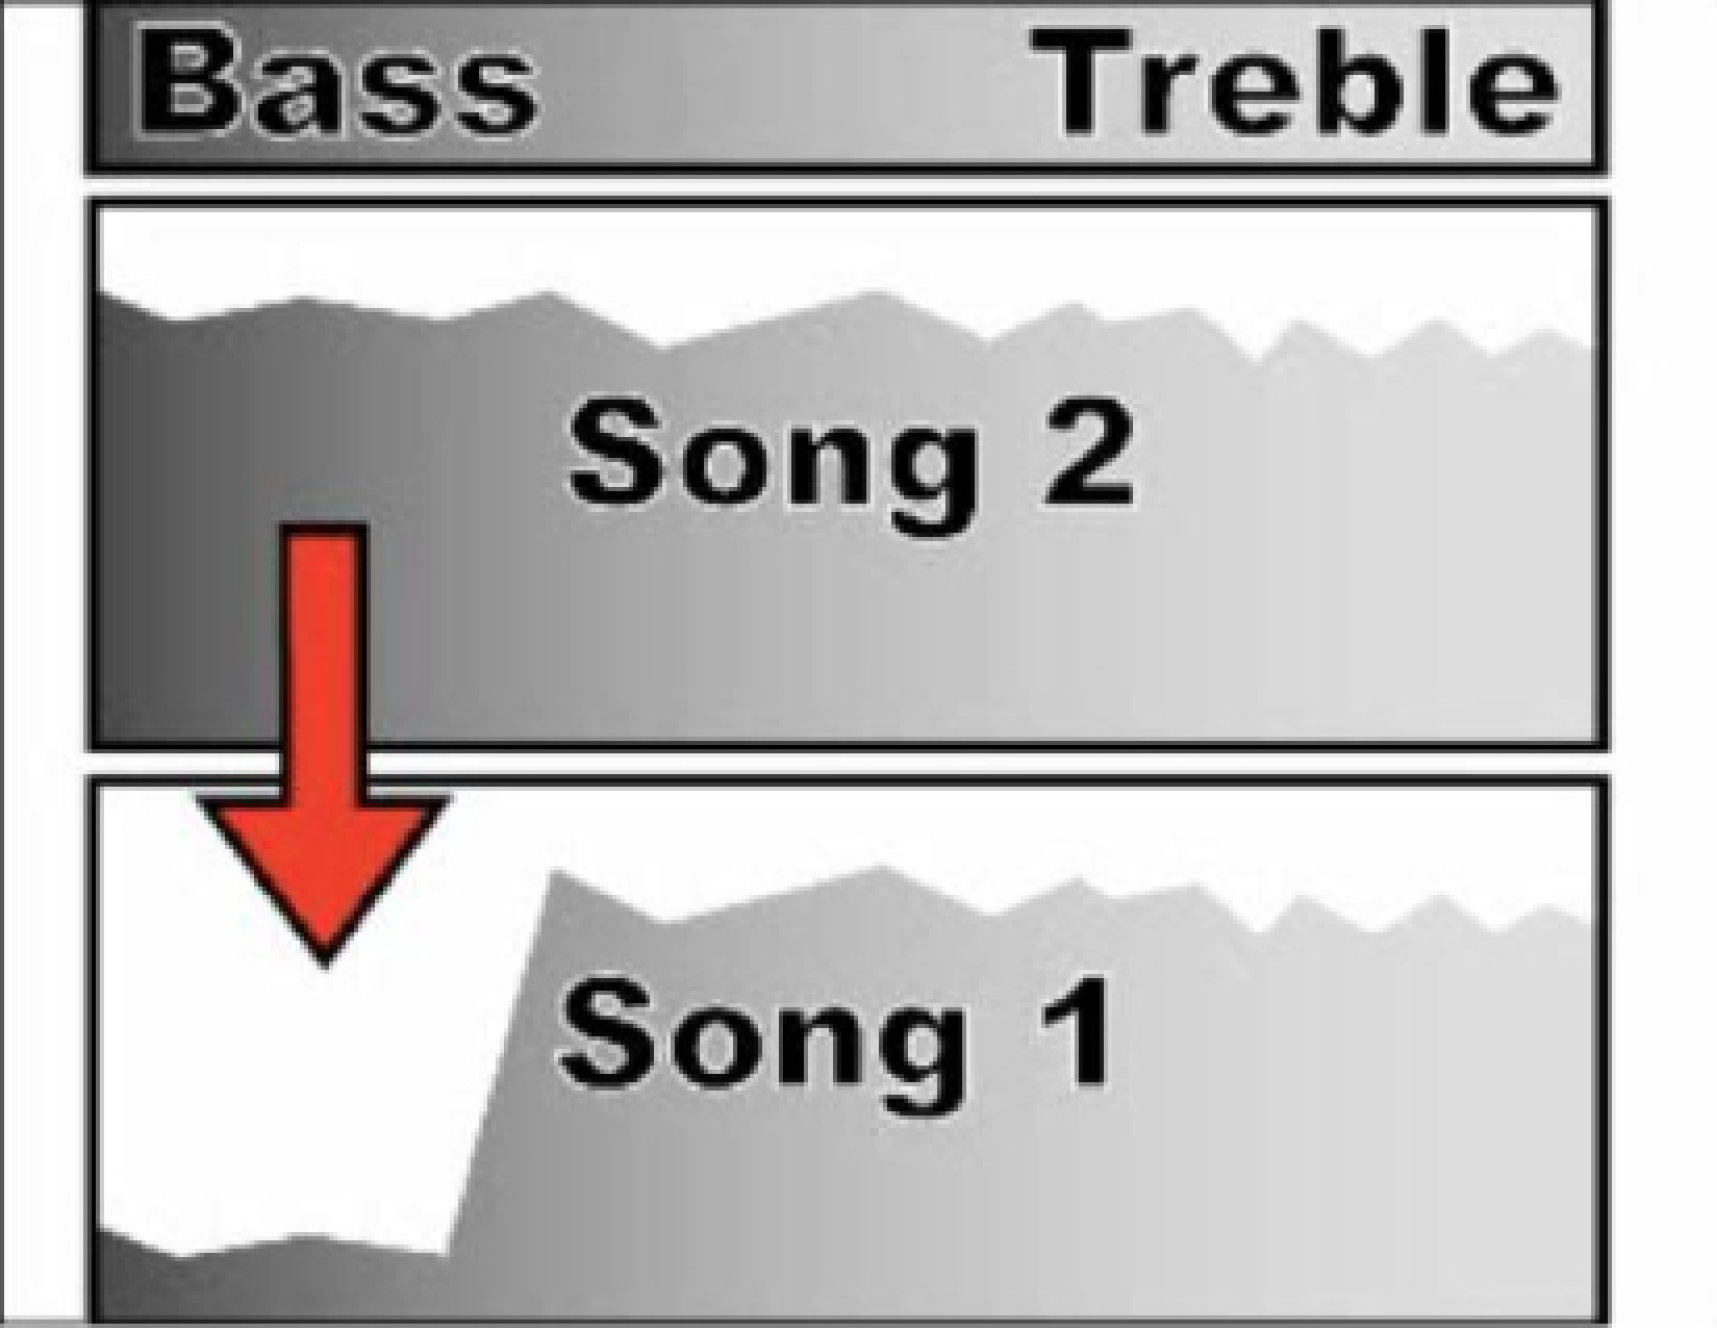
In this section we’ll cover the idea of smart mixing where compressors and EQs are used to automate some of the tasks in making a mix. When a sidechain compressor in conjunction with an EQ to limit the frequency range, then when the level of that frequency band in Song 2 rises past a certain threshold then it activates a compressor on the same frequency band, but applied to Song 1. In this case Song 1 automatically gets out of the way when Song 2 is present for the bass. This is not possible to do with most DJ software without using external compressors, but it can be acomplished with Ableton Live and we will see how in a later Chapter.
This can be done by using a sidechain compressor.
Using one song as the key input to reduce the level of another song.
VirtualDJ Mashup Assignment
- Choose four pieces of music that you will remix into a mashup.
- Make use of CUE points to plot out where one track can be mixed into another.
- Choose or create five samples to use.
- Record a remix that is 1-5minutes in length and turn in to SoundCloud. (It is also possible to stream your mix (See FIG#)
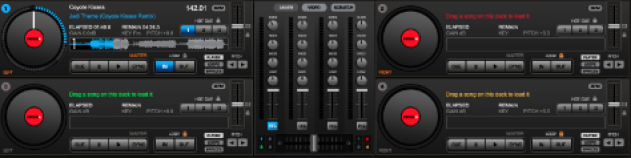
- For extra credit you may change to a four deck setup (see FIG#) and make a mashup where you have four pieces playing simultaneously at some point in your mix. (To set this up goto Config->Skins and choose a four deck skin for your screen resolution.)
Automation, Dummy Clips and Follow
|
Automation
|
Dummy Clips; Creating Variations
|
Triggering with Follow
|
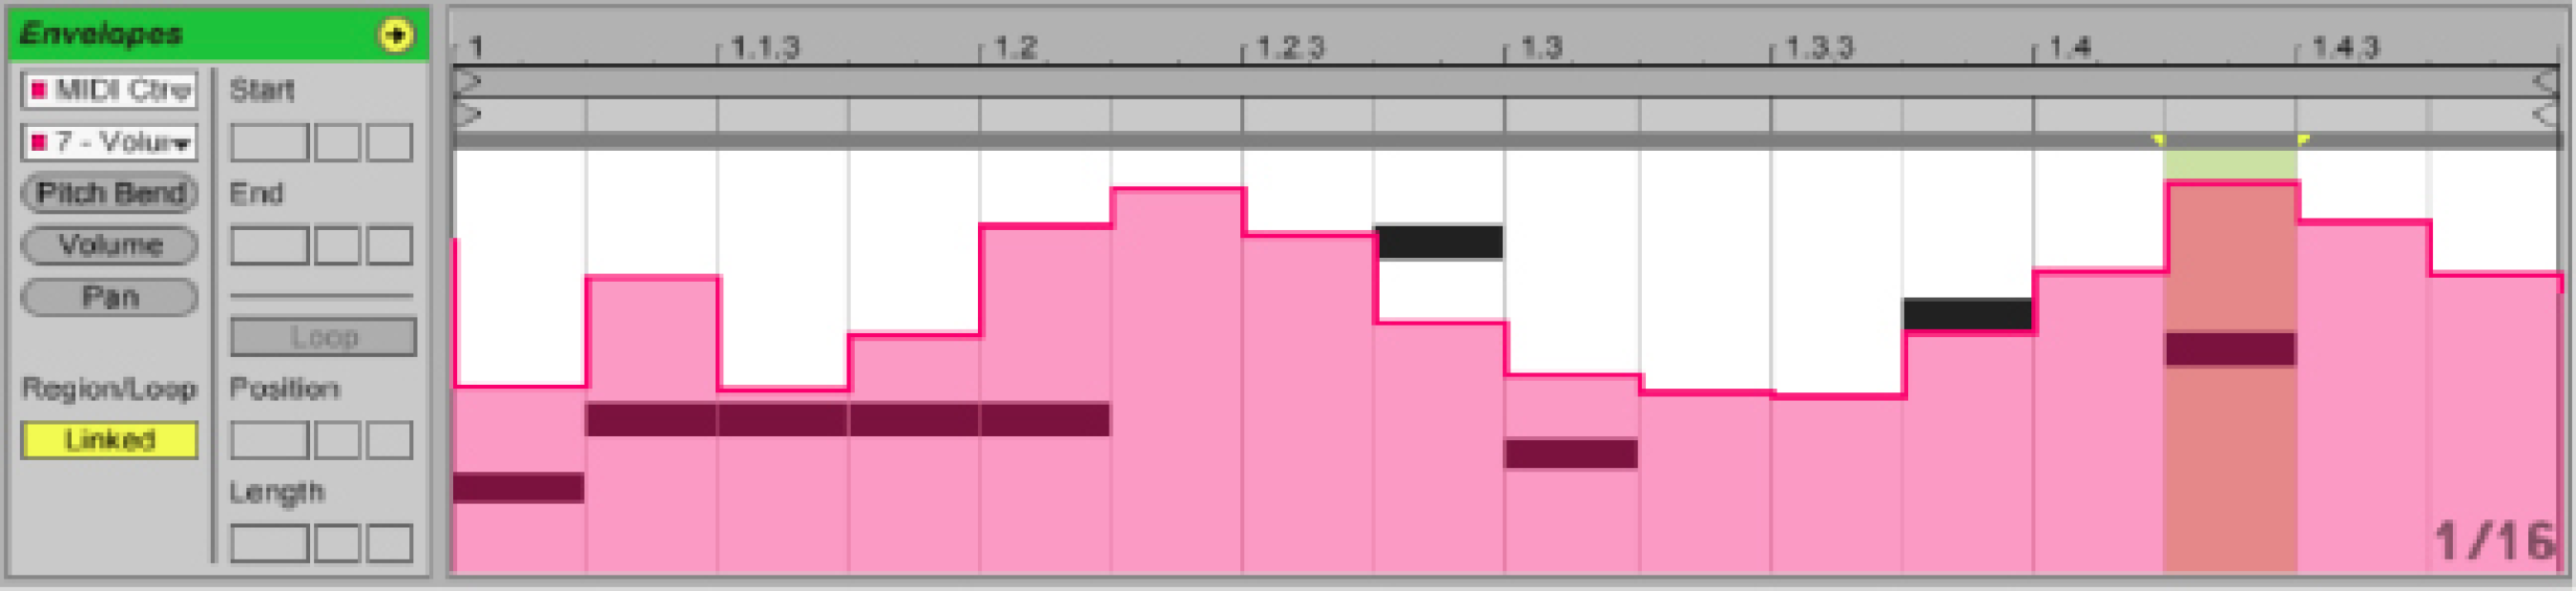
- Envelopes in Session and Arrangement Views
|
|
|
You will need to consult the MIDI Mappings table in the next step to assign the MIDI Clip Envelopes to the correct devices.
In the first MIDI track (redux) do the following:
Double click on a clip slot. This will open a MIDI clip on the bottom.
Show the Envelope Box (button E in Clip View) and select in the top chooser box “MIDI Ctrl” as the device to automate.
Select in the bottom box Clip Envelope Control number that is appropriate for that track according to your MIDI Mappings table that you created before.
Optional: click on the Linked button (Region/Loop) to turn linking off / should shows now “Unlinked”. In the envelope editor drag the right loop end and extend it to 8 or 16 bars.
Use a pencil (Click on Draw Mode or Control - B (Win) / Command - B (Mac)) to draw an envelope shape.
In Launch Box turn on Legato and select Follow Actions to Play Again and Other with equal chances (type 1:1 in the bottom box).
Copy this clip down the same track several times. Edit the envelope in each of the copied clips by drawing different curves such as zigzag, rise and fall, step up and down, or some random change.
Repeat this process for each one of the remaining MIDI tracks (tempo, xfade) choosing each time a MIDI Ctrl envelope according to the MIDI mapping table.
Remember that the way we organized our set is that MIDI track names represent the devices they control, so all clips in one track should operate on the same MIDI Ctrl.
At this point you should have the control tracks programmed with alternative envelope curves ready to start modifying the effects on the audio tracks by random triggering of MIDI clips.
Drop two different songs into the Audio tracks 1 and 2. You might want to experiment with Re-Pitch versus Complex Warping in the audio clips. Make sure that these tracks have correct warping by testing them with a metronome, and set the tracks to loop so that the songs do not stop when they reach their end (set the loop braces to beginning and end of the songs).
Now when everything is set. Press play button and ...!!! After a while, just drop other clips into the Audio tracks and keep the fun going :)
Another option is dropping multiple clips in each audio track and setting the Follow Actions to jump between the songs (like we did in part A).
One problem with the follow method is that the control envelopes and the audio recording are bundled together into one clip. So if you want to drop in a new clip and apply the same processing to it you would have to record or draw the envelopes over and over again.
We can use the technique of dummy clips to separate effects from clips in session view. We will explore this technique in first part of this exercise.
However, clip envelopes cannot be used to automate master controls, such as crossfade between A and B clips that are essential for DJing. Automation using MIDI controls will be done in the second part of this exercise.
Create two audio tracks. On track 1 drop several audio clips. In Launch Box turn on Legato and set follow actions to every 4 bars and Any.
Set “Audio To” to 2-Audio and turn Monitor Off
On track 2 set “From” to 1-Audio and Monitor In
Dummy Clips
On track 2 drop a beat repeat effect.
Record a silent clip into first slot on track 2.
Double click on the clip slot. This will open an audio clip on the bottom. Display the Envelope Box (button E in Clip View) and select in the top chooser box “Beat Repeat” and “Chance”.
In this part of the assignment we will show an advanced technique that uses MIDI clips as controls of Audio clips in the same live set. This is achieved by special routing of MIDI from Ableton to itself by setting it in the Preferences. This is not a normal way of routing MIDI across tracks. In Ableton MIDI can not be routed to Audio track without converting it to sound through an instrument. So somewhat like “side chaining” that uses audio from one channel to control and effect on another channel, we will be using MIDI to control effects on another channel through the unique Remote control facility of Ableton.
Setting the preferences.
Go to: Live -> Preferences -> MIDI Sync tab. Set MIDI Ports sections as:
Input: IAC Driver (Bus 1), Track “Off”, Sync “Off”, Remote “On”
Output: Track “On”, Sync “On”, Remote “Off”
Note - In some cases you might not have IAC Driver enabled on your mac. (MIDI Yoke on Windows).
On Mac: Go to Applications -> Utilities -> double click Audio Midi Setup
Double click IAC Driver and check the “online” box
Now you should be able to go back to Live Preferences and set the Midi routing as described.
Creating the set:
Create two audio tracks with 2 effects each. For the purpose of the exercise choose Redux, and Beat Repeat. Set Audio 1 to A and Audio 2 to B crossfade.
Create three midi tracks. Name the Midi tracks - redux, tempo and xfade. Show the I/O section and set MIDI To to IAC Driver.
Create a remote control midi map for the following parameters on each audio track (in other words click on MIDI Map Switch, select a parameters, and move a midi button or slider):
redux downsample
project tempo
master track crossfader
Optional: click on the Linked button (Region/Loop) to turn linking off / should shows now “Unlinked” and In drag the right loop end in the envelope editor and extend it to 8 or 16 bars.
Use a pencil (Click on Draw Mode or Control - B (Win) / Command - B (Mac)) to draw an envelope shape. For instance you can choose to start with a rising line.
In Launch Box turn on Legato and select Follow Actions to Play Again and Other with equal chances (type 1:1 in the bottom box).
Alt-drag (copy) the clip 3 times to create 4 dummy clips. Draw new envelope for each dummy clip to get a different behavior or automate a different control parameter.
Run it:
Turn on the first scene and see and listen to how the clips switch and the effects change.
- Clip envelope parameters:
- Contain a single control value
- Are real-time changes that occur during playback
- Are destructive edits to the sample source
- None of the above
- Clip envelopes appears as:
- Series of bar graphs
- Database spreadsheet
- Visual graph of control values
- None of the above
- If Clip envelope is hidden, the effect is disabled
- True
- False
- In live session only one clip envelope is available per clip
- True
- False
- When using clip volume it is possible to:
- Create clip fade in and out
- Create panning
- Create pitch changes
- None of the above
- When using panning envelope it is possible to
- Create fade in and out
- Move across stereo field
- Pitch change
- None of the above
- Transposition clip envelope allows to:
- Create fade in and out
- Move across stereo field
- Change pitch
- None of the above
- Unlinking the clip envelope:
- Can be done only in Arrangement view
- Allows creating envelope curves that have different duration then the clip
- Both 1 and 2 are true
- None of the above
- Clip follow functions:
- Exist only for clips in Session View
- Allow random switching among clips on the same track only
- Are used for dummy clips
- All of the above
- Freezing a track
- Saves on computer processing by recording all effects and instruments into a temporary audio file
- Can be done on MIDI tracks only
- Should be only done before final mix since it can not be undone
- All of the above are true
- Which of the following can not be done using a Dummy Audio Clip?
- Control the project tempo
- Control Tracks Crossfade
- Control Panning of Individual Clips
- None of the above
|
Moldovar set; crossfade with compression (requires MIDI controller)
|
Types of controllers
|
Future of controllers
|
|
|
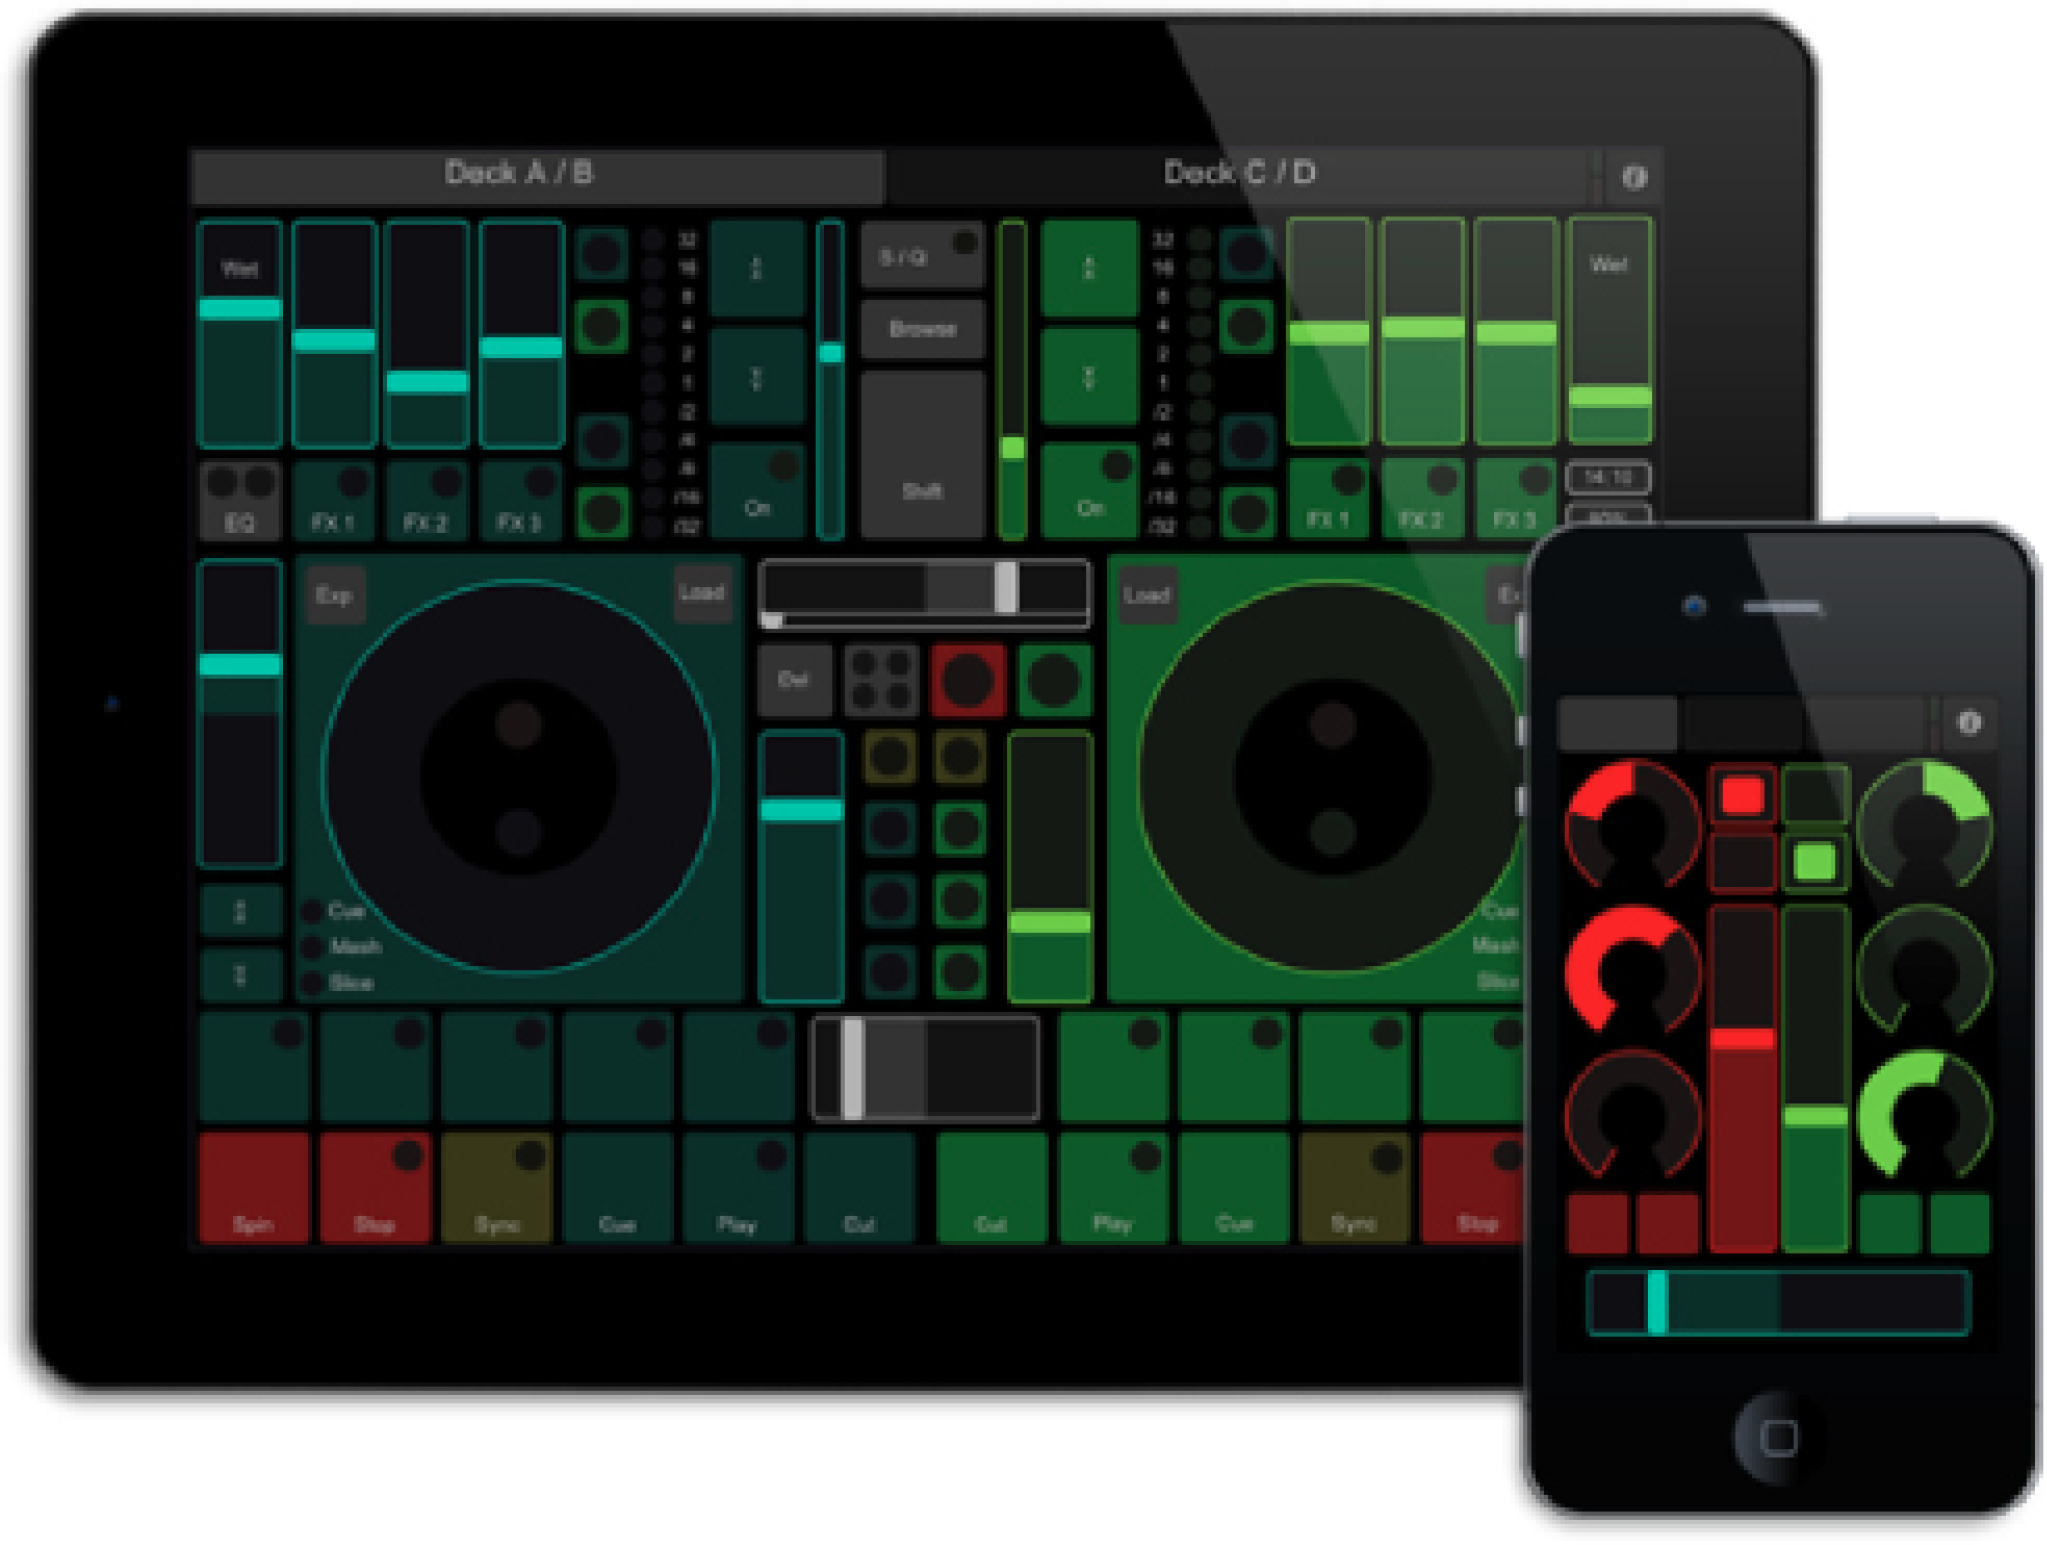
- Open Sound Control and wireless controllers...bluetooth vs Wifi (for OSC basics refer to MODULE B 5c)
- TouchOSC and similar apps
|
- Classic: Knobs, sliders/faders, buttons, joysticks
- Touchscreens, aftertouch
- Sensors; accelerometers (Wii), gps, piezo
- Motion capture; kinect, leapmotion...gesture recognition
|
Deck A/B
to SC A/B and Cue A/B
crossfader assigned A/B
Cue button allows you to preview the track.